Here is some essentials online tools that deserves to be known:
1 Minify your php script with minifyPHP
2 Minify your javascripts with jscssminifier
3 Un-minify your javascripts with jsbeautifier
4 Compare two files online with diffnow
5 A web interface to connect to your ftp server: net2ftp
6 Take a snapshot of a website with different browsers and screen sizes with browsershots
7 Create a favicon online from an image with this service from chami.com
8 Crack your pdf online with pdfcrack
9 Decode a barcode by uploading an image to onlinebarcodereader
10 Download every online video with keepvid
11 Create an animated GIF with GifMaker
12 Create a custom map from OSM datas with Maposmatic
This tutorial is covering an almost complete teardown of one of the first rangefinder cameras ever produced, the Leica F (or Leica III), produced from 1935 to 1940.
This tutorial covers the first model of Leica III. You will find great similarities with models IIIa and IIIb. Models from Leica IIIc are really different by design.
By "almost complete disassembly", I mean allowing access to most parts of the camera, if the curtains are dead of course, you will have some more screws to remove.
Hardware
- Several small flat screwdriver if possible magnetized . Note that the so-called " precision " commercially screwdriver may be too big for the watch .
- A clean brush to remove dust ;
- A flat nose pliers if you want to try removing the rangefinder in warrior mode.
- A box with compartments in order to place as and when the various screws you remove .
Preliminary Note
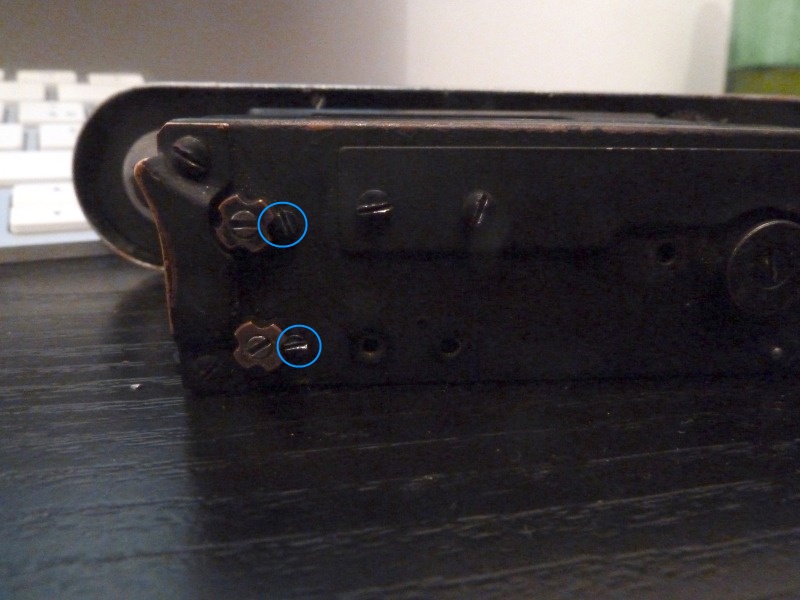
If you want to adjust the curtains' tension, there's no need to teardown the whole camera, this setting is at the bottom, by removing the small black screws that release the adjusting gears.
Step 1 - Removal of the camera body
Begin by removing the base and the cylinder of the film.
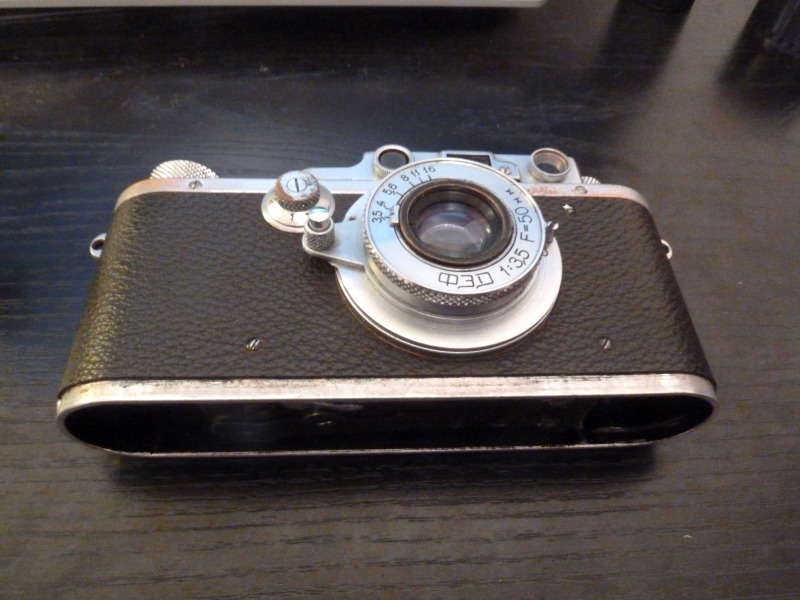
After locking the lens, remove it.
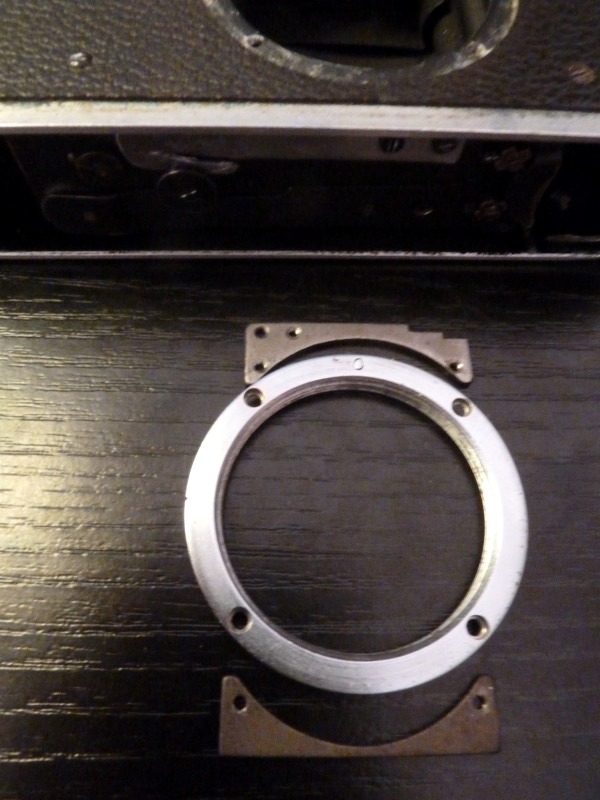
Remove the four screws that secure the support of the lens.
Warning , the bottom two screws hold a small metal plate. Avoid dropping it on the curtains.
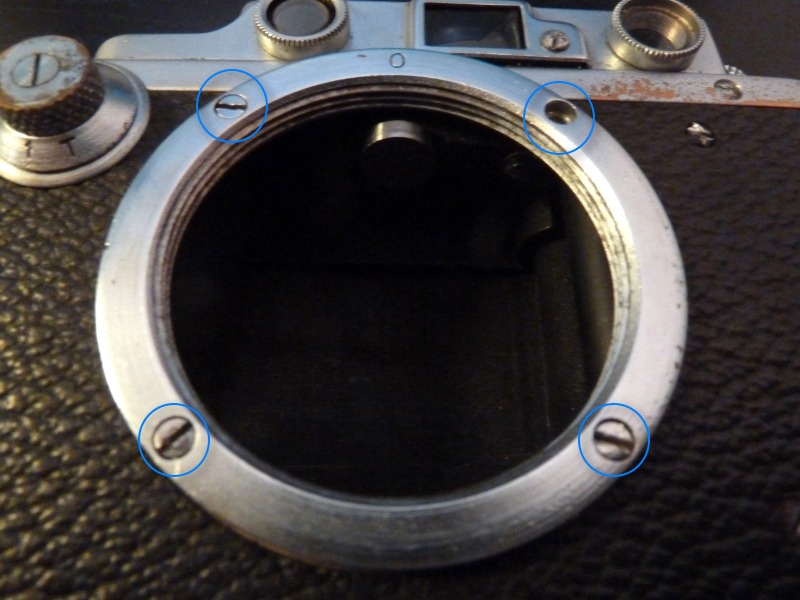
Remove the last screw holding the upper plate.
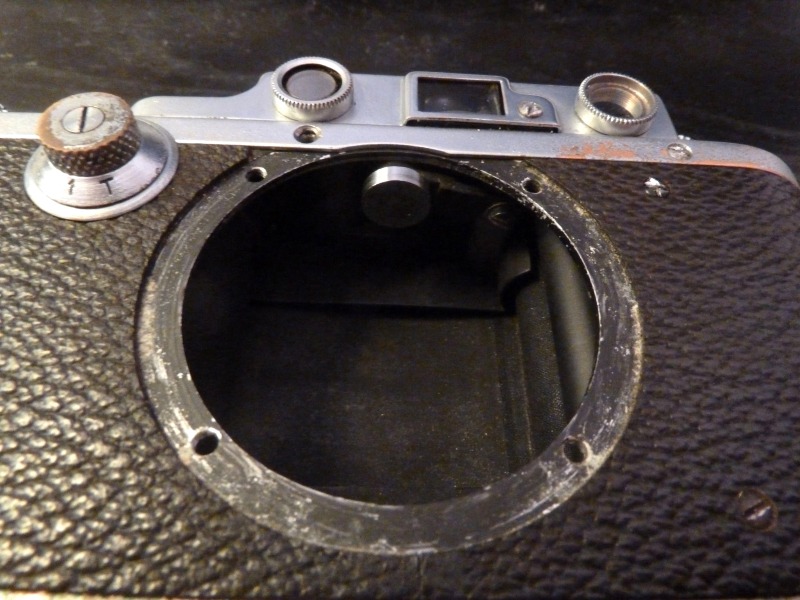
You should be there.
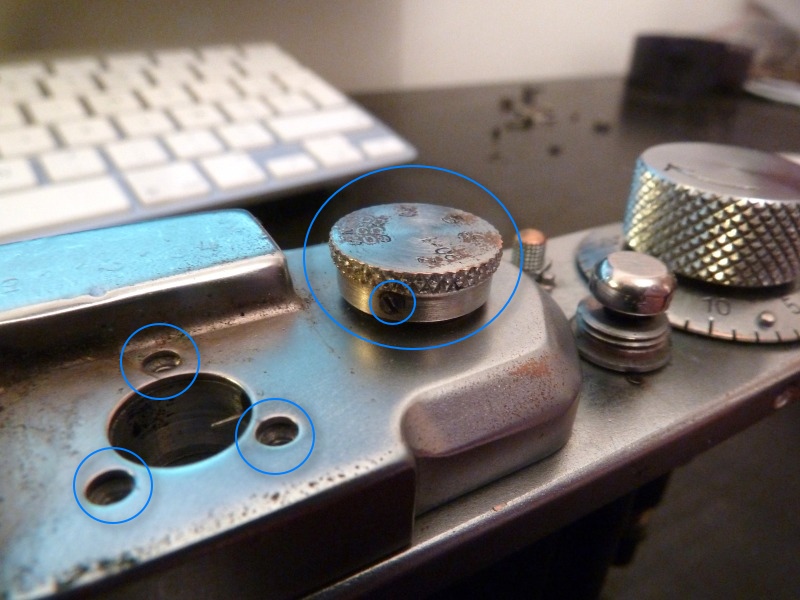
Remove the three screws on the front panel of the unit.
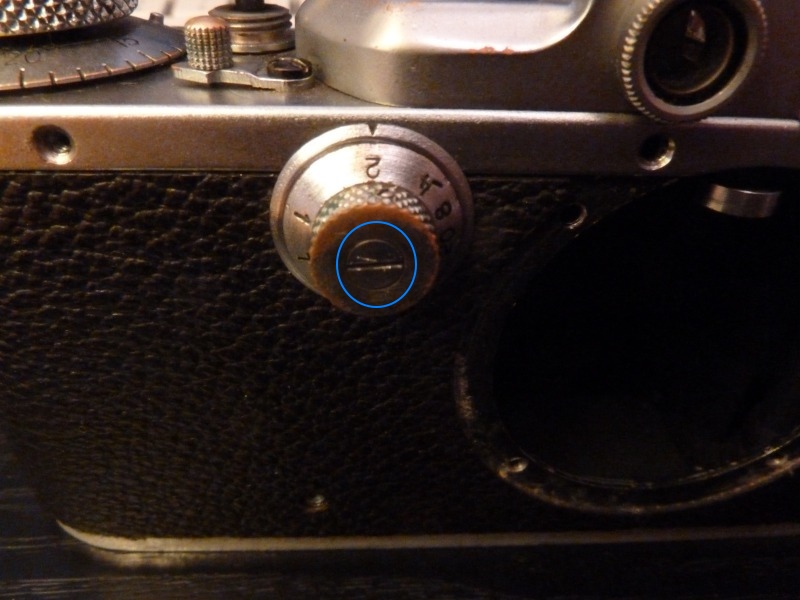
Remove the scew that secure the slow shutter knob, remove the three screws that sits behind. Memorize how these parts are mounted, if necessary by taking pictures.
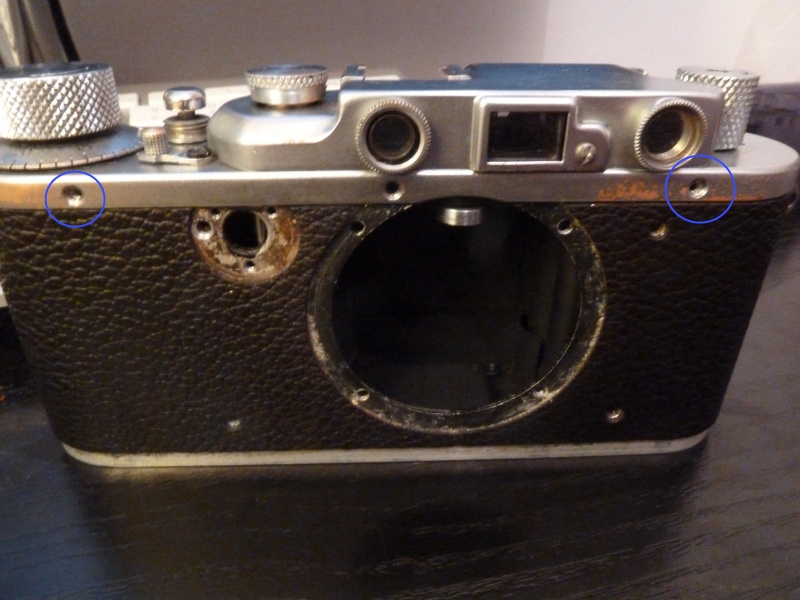
Remove the five screws that hold the top of the unit to the housing. There are two in front, three behind.
You can now slide the camera from the case. Pay close attention to the rangefinder arm, which should be kept inside during the operation.
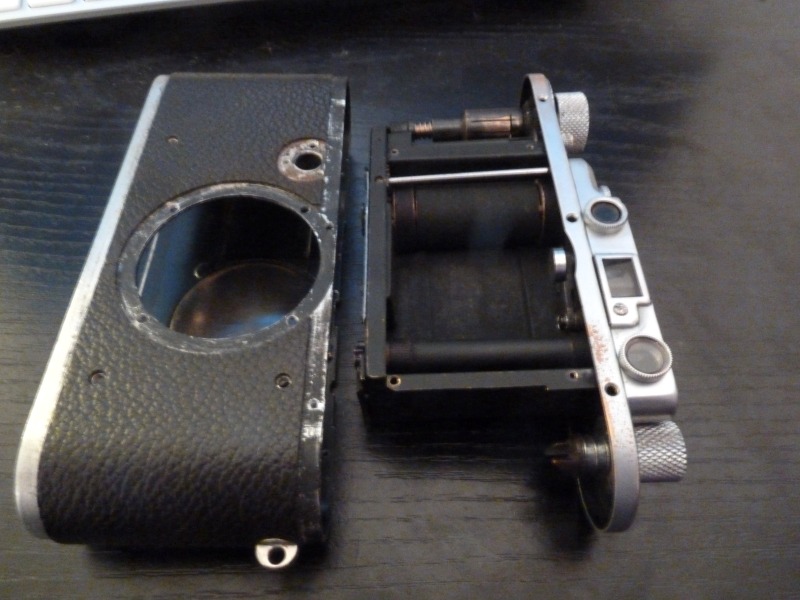
The first step is now complete.
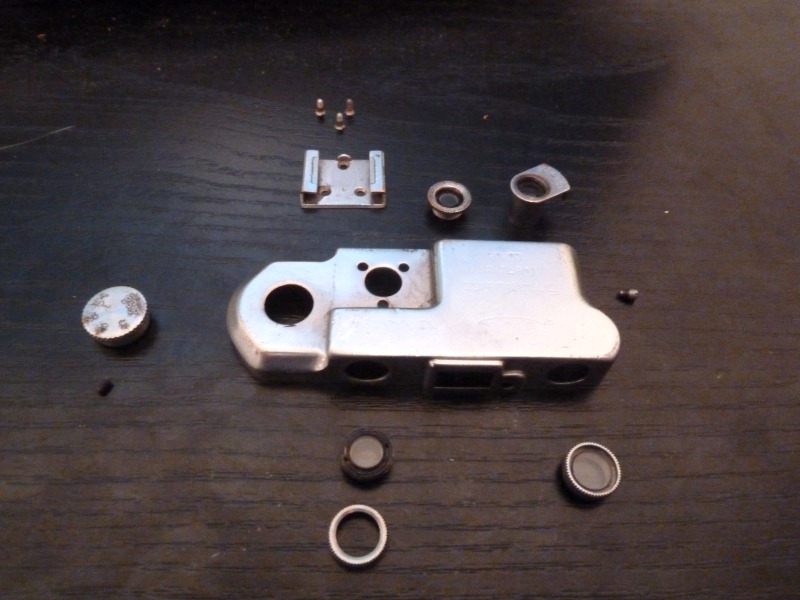
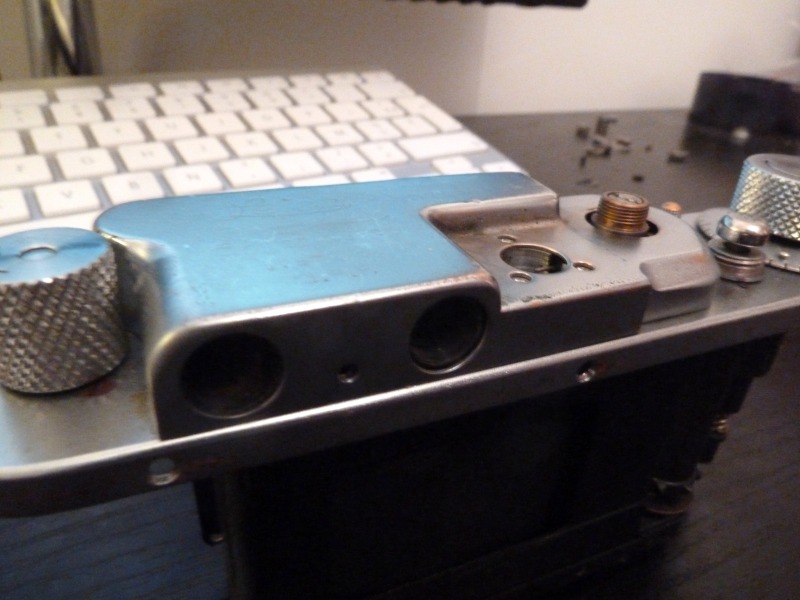
Step 2 - Removing the rangefinder cover
To give you an idea, here is the final result we want to achieve.
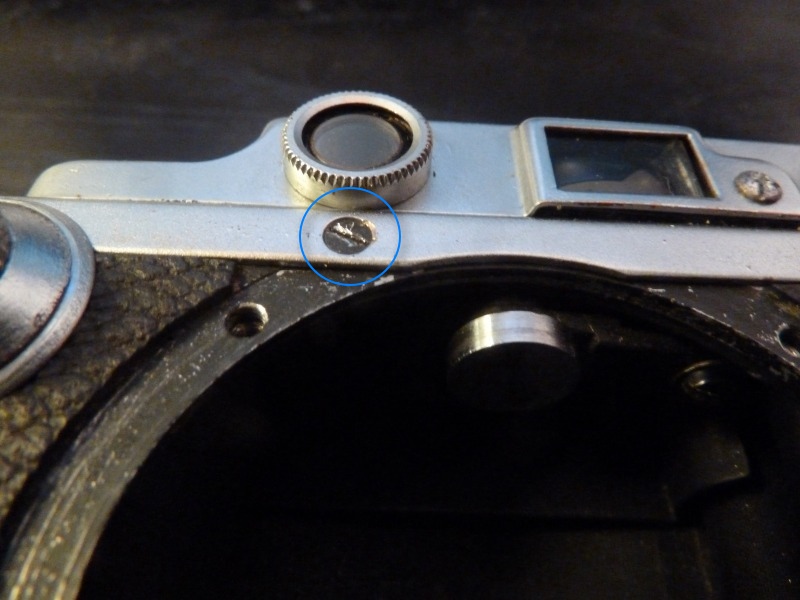
Remove the screw that secures the left viewfinder.
Remove the viewfinder by gently pulling it backwards.
Loosen the rear screw.
Remove the main viewfinder by unscrewing it (if necessary use a pair of pliers, without forcing on optical)
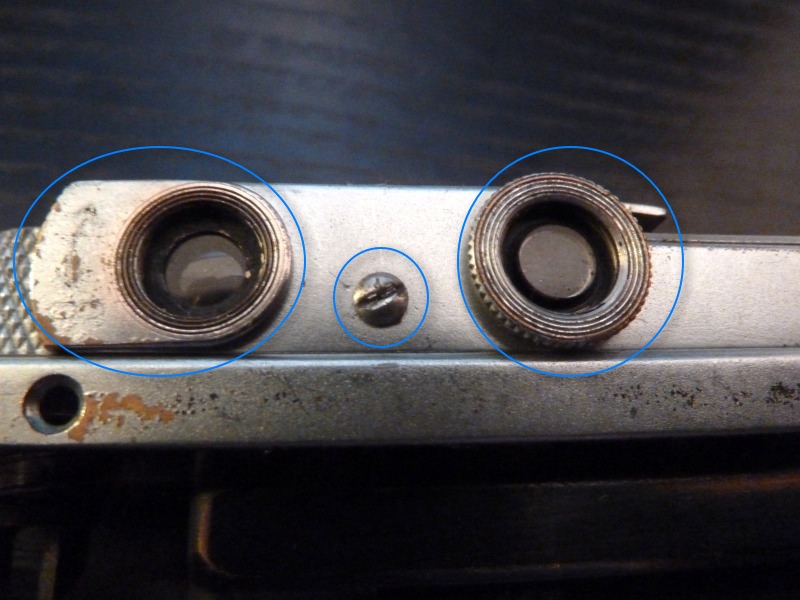
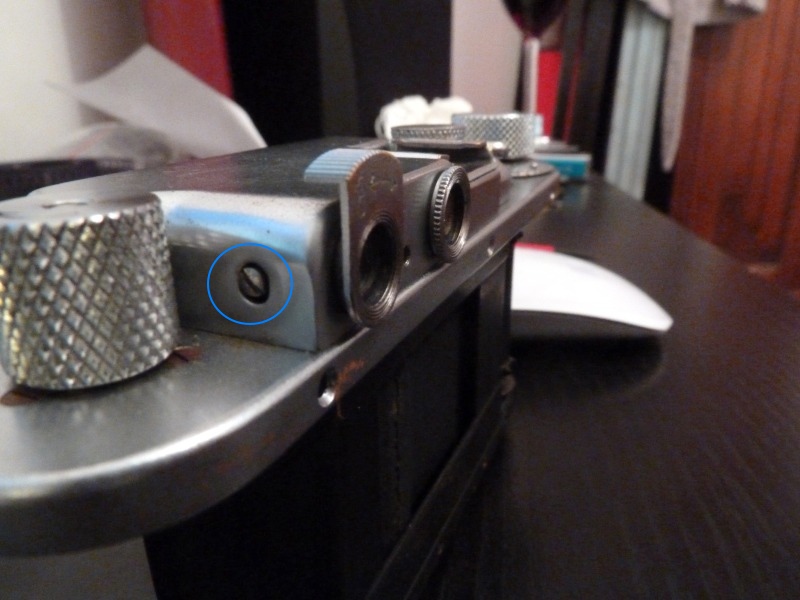
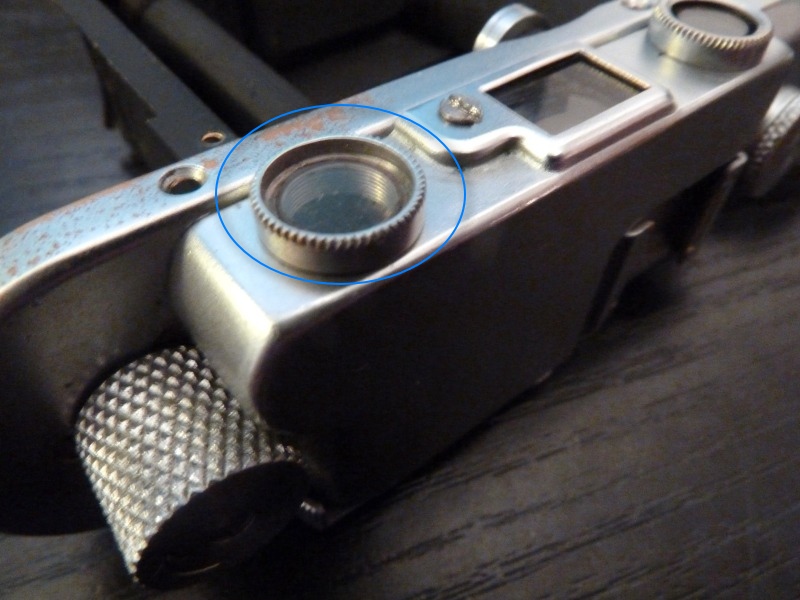
Unscrew the rangefinder right lens.
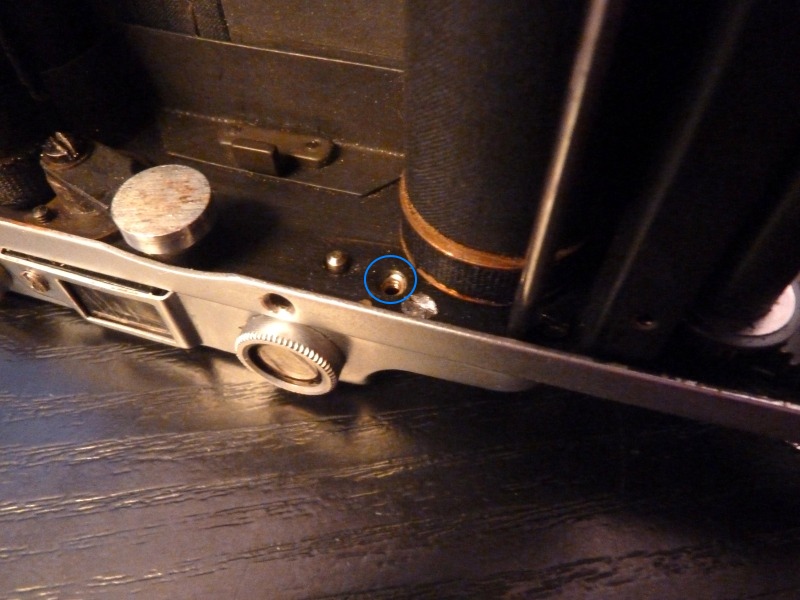
Turn the unit and remove the screw shown in the picture.
Remove the optical pull strap of the rangefinder left lens by unscrewing it.
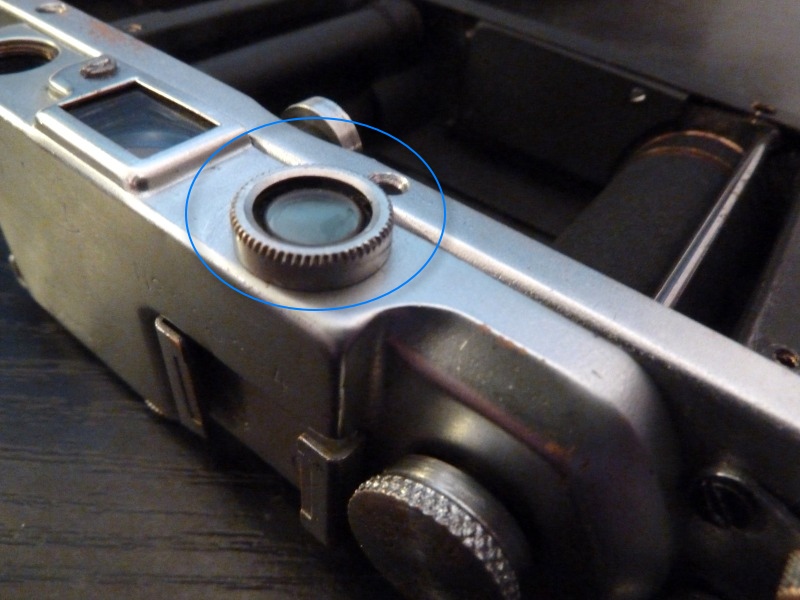
Remove the optical by turning it very gently (with a pair of pliers if needed).
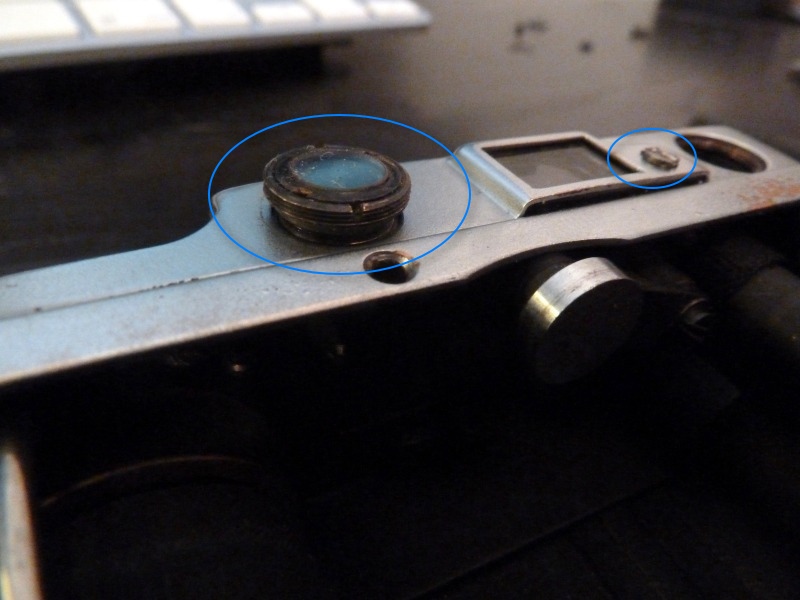
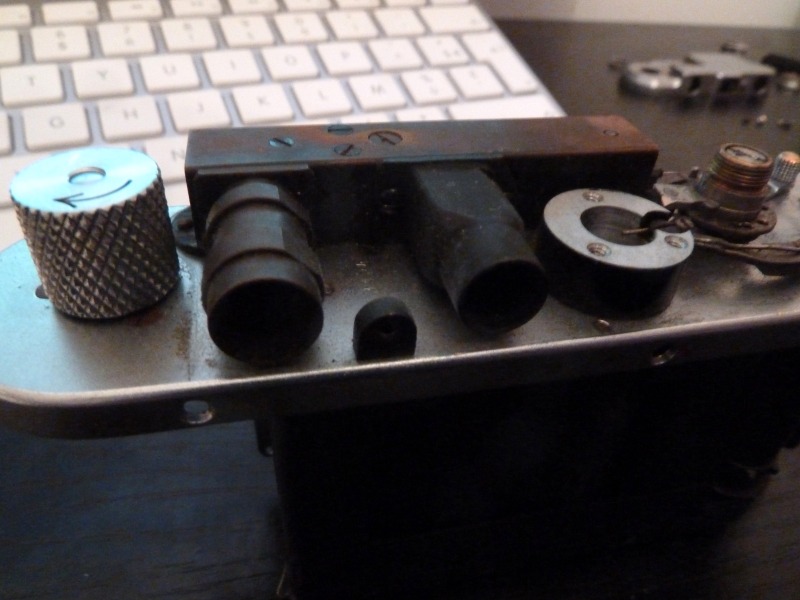
Remove the top plate which is held by three screws, remove the small screw from the shutter time selector and unscrew it.
Normally you're there. You can now remove the top cover.
You now have access to the shutter mechanism ...
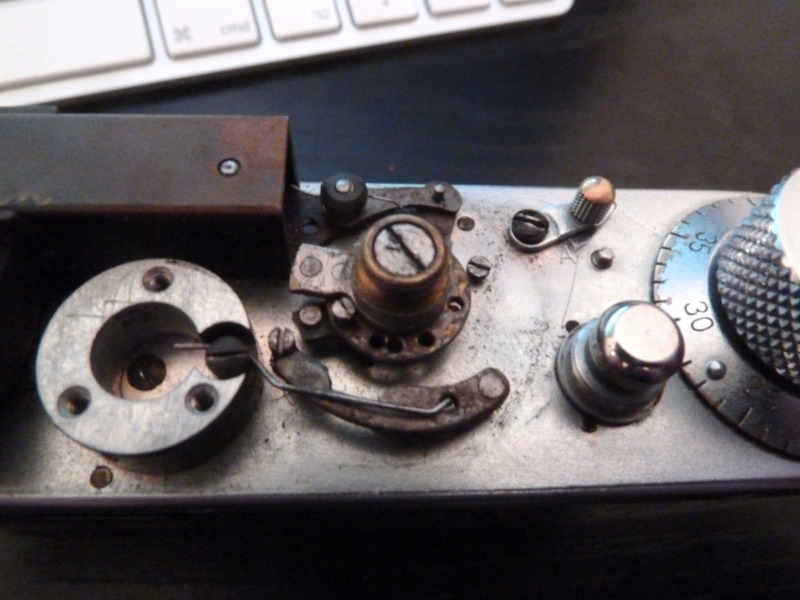
... and to the rangefinder.
To reassemble, follow this tutorial in reverse, and TAKE YOUR TIME. There is nothing worse than having to re-disassemble the whole stuff because you forget a screw.
This tutorial covers the first model of Leica III. You will find great similarities with models IIIa and IIIb. Models from Leica IIIc are really different by design.
By "almost complete disassembly", I mean allowing access to most parts of the camera, if the curtains are dead of course, you will have some more screws to remove.
Hardware
- Several small flat screwdriver if possible magnetized . Note that the so-called " precision " commercially screwdriver may be too big for the watch .
- A clean brush to remove dust ;
- A flat nose pliers if you want to try removing the rangefinder in warrior mode.
- A box with compartments in order to place as and when the various screws you remove .
Preliminary Note
If you want to adjust the curtains' tension, there's no need to teardown the whole camera, this setting is at the bottom, by removing the small black screws that release the adjusting gears.
Step 1 - Removal of the camera body
Begin by removing the base and the cylinder of the film.
After locking the lens, remove it.
Remove the four screws that secure the support of the lens.
Warning , the bottom two screws hold a small metal plate. Avoid dropping it on the curtains.
Remove the last screw holding the upper plate.
You should be there.
Remove the three screws on the front panel of the unit.
Remove the scew that secure the slow shutter knob, remove the three screws that sits behind. Memorize how these parts are mounted, if necessary by taking pictures.
Remove the five screws that hold the top of the unit to the housing. There are two in front, three behind.
You can now slide the camera from the case. Pay close attention to the rangefinder arm, which should be kept inside during the operation.
The first step is now complete.
Step 2 - Removing the rangefinder cover
To give you an idea, here is the final result we want to achieve.
Remove the screw that secures the left viewfinder.
Remove the viewfinder by gently pulling it backwards.
Loosen the rear screw.
Remove the main viewfinder by unscrewing it (if necessary use a pair of pliers, without forcing on optical)
Unscrew the rangefinder right lens.
Turn the unit and remove the screw shown in the picture.
Remove the optical pull strap of the rangefinder left lens by unscrewing it.
Remove the optical by turning it very gently (with a pair of pliers if needed).
Remove the top plate which is held by three screws, remove the small screw from the shutter time selector and unscrew it.
Normally you're there. You can now remove the top cover.
You now have access to the shutter mechanism ...
... and to the rangefinder.
To reassemble, follow this tutorial in reverse, and TAKE YOUR TIME. There is nothing worse than having to re-disassemble the whole stuff because you forget a screw.
English version
Nous allons procéder au démontage quasi-complet de l'un des premiers appareils photos à mise au point télémétrique jamais produit, le Leica F (ou Leica III), produit de 1935 a 1940.
Ce tutoriel couvre le premier modèle de Leica III. Vous trouverez de grandes similarités avec les modèles IIIa et IIIb. Les modèles à partir du Leica IIIc sont largement différents dans leur conception.
Par démontage quasi-complet, j’entends permettre l’accès à la plupart des éléments de l'appareil, bien évidemment si les rideaux sont morts, vous aurez quelques vis de plus à enlever.
Matériel
- Plusieurs petits tournevis plats si possible aimantés. Notez bien que les tournevis dits "de précision" vendus dans le commerce peuvent être encore trop gros pour de l'horlogerie.
- Un pinceau propre, pour enlever les poussières;
- Une pince à bec plat si vous voulez vous tenter le démontage du télémètre en mode warrior.
- Une boîte avec casiers afin d'y placer au fur et à mesure les différentes vis que vous enlevez.
Note préliminaire
Si vous cherchez à régler la tension des rideaux, inutile de démonter tout l'appareil, ça se règle en dessous, en retirant les petites vis noir qui dégagent les roues dentées permettant le réglage.
Étape 1 - Retrait du corps de l'appareil
Commencez par retirer le socle et le cylindre de la pellicule.
Après avoir verrouillé l'objectif, dévissez-le, puis retirez les 4 vis qui maintiennent le support de l'objectif.
Attention, les deux vis du bas maintiennent une petite plaque de métal. Évitez de la faire tomber sur les rideaux.
Retirez cette dernière vis, en retenant la plaque de maintien supérieure.
Vous devriez en être là.
Retirez ensuite les trois vis de la face avant de l'appareil.
Démontez le bouton de réglage de l'obturation lente, en enlevant la première vis, puis les trois qui sont derrière. Mémorisez bien la façon dont ces différentes pièces sont montées, au besoin en prenant des photos.
Retirez les cinq vis qui maintiennent le haut de l'appareil au boîtier. Il y en a deux devant, trois derrière.
L'intérieur de l'appareil peut maintenant coulisser. Faites très attention au bras du télémètre, qui doit être maintenu à l'intérieur durant l'opération.
La première étape est terminée.
Étape 2 - Démontage du capot du télémètre.
Afin de vous faire une idée, voici le résultat final auquel nous voulons parvenir.
Retirez la vis qui bloque le viseur du télémètre.
Retirez le viseur en le tirant délicatement vers l'arrière.
Dévissez la vis arrière.
Enlever le viseur principal en le dévissant (au besoin munissez-vous d'une pince, sans trop forcer sur les optiques)
Dévissez l'objectif de droite du télémètre.
Retournez l'appareil et retirez la vis indiquée sur la photo.
Retirez en le dévissant le cerclage de l'optique de l'objectif gauche du télémètre.
Retirez l'optique en la dévissant très délicatement, puis dévissez la vis centrale de l'objectif.
Retirez la plaque supérieure qui est maintenue par trois vis, retirez la petite vis du sélecteur de temps d'obturation, et dévissez-le.
Normalement vous en êtes là. Vous pouvez maintenant enlever le capot.
Vous avez maintenant accès au mécanisme d'obturation...
...ainsi qu'au télémètre.
Pour le remontage, suivez ce guide en sens inverse, et surtout prenez votre temps. Il n'y a rien de pire que devoir re-démonter car on a oublié une vis.
If your iPhone 4 switch quickly between "Searching" and "No service" after a fall or an attempt to repair the screen, you may have damaged the blue coil inductor, present near the battery connector (see picture).
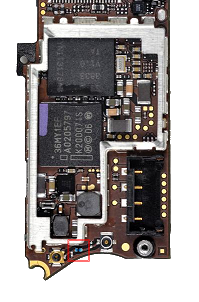
This component is here to pre-amplify (moderately) the GSM signal between the antenna and the oscillator who filter out unwanted frequencies.
This is not a totally vital component, and it may not be worth trying to change it.
You can find this component on eBay for 8 euros, but it will be difficult to weld without special CMS equipment an solid skills. Some folks can do it for sixty euros, but that is a little bit too much.
The best thing to do in my opinion, having tested it on two iPhone 4, is to make a jumper with tin or a copper wire between the two legs of the lost component, and you will get your signal back.
I then made in a few seconds a mere trace of tin soldering between the two legs of the inductor, and I got five bars of network on an iPhone 4 that was picking absolutely nothing.
Of course, even if it is at the reach of anybody, it is still better to perform the operation under a magnifying glass, without trembling, and especially not to insist on temperature. There are vital components such as baseband nearby, and the surface is very small, so there is no need for too much heat.
Some guys are using heat gun. I would not recommend it for the same reason (too much heat, small surface, vital components nearby).
I saw on some sites that you could also make a jumper in case of loss of the oscillator (the golden circle component to the left of the blue inductor in the image).
I would not recommend it. Frequencies will not be filtered at all, and there will be virtually no protection between the antenna and the input signal in the baseband.
Si la barre de réseau de votre iPhone 4 oscille entre "Recherche" et "Réseau indisponible" après une chute ou une tentative de réparation, vous avez peut-être abîmé l'inducteur, de couleur bleue, présent à côté du connecteur de batterie (voir image).
Ce composant est chargé de pré-amplifier (modérément) le signal GSM entre l'antenne et un oscillateur qui filtrera les fréquences indésirables.
Ce n'est donc pas un composant totalement vital, et ce n'est peut-être pas la peine d'essayer de le changer.
Car bien que vous puissiez trouver ce composant sur eBay à 8 euros, il vous sera difficile de le souder sans du matériel spécial CMS. Des sociétés peuvent vous le faire pour une soixantaine d'euros, mais, soyons franc ça fait cher.
La meilleure chose à faire à mon avis, pour l'avoir testé sur deux iPhone 4, c'est de faire un jumper en étain ou en fil de cuivre entre les deux pattes du composant perdu, et vous récupérerez votre signal.
J'ai d'ailleurs fait en quelques secondes une simple trace d'étain au fer à souder entre les deux pattes de l'inducteur, et j'ai récupéré cinq barres de réseau sur un iPhone 4 qui ne captait absolument plus rien.
Naturellement, même si c'est à la portée du premier venu, il vaut tout de même mieux réaliser l'opération sous une loupe, sans trembler, et surtout ne pas insister trop niveau température. Il y a des composants vitaux tels que le baseband a proximité, alors la surface étant très petite il est inutile de trop chauffer.
J'ai vu sur certains sites que l'on pouvait également réaliser un jumper en cas de perte de l'oscillateur (le composant doré rond à gauche de l'inducteur bleu, sur l'image).
Je le déconseille. Les fréquences seront alors mal filtrées, et il n'y aura quasiment plus aucune protection entre l'antenne et l'entrée du signal dans le baseband.
Si vous avez deux iDevices que vous souhaitez connecter en SSH, notamment pour des opérations de backup (en utilisant LaunchD par exemple), ou simplement pour le fun, il est nécessaire que les clés publiques de vos devices aient été échangées afin d'éviter de passer par un mot de passe.
Sur ce sujet, d'ailleurs, l'installation de ssh sur un appareil iOS nécessite le changement de mot de passe des utilisateurs root et mobile, puisque les deux sont fixés par défaut sur "alpine". Question sécurité, je ne vous fait pas de dessin.
De plus si votre Apple TV / iPad / iPod / iPhone / Mac Mini ont un port ouvert sur votre routeur vers l'internet mondial, il est préférable de passer par un port non standard de type 1234, 2222, 2002 en lieu et place du port 22 par défaut sur SSH, afin d'éviter en partie les tentatives d'intrusions (plus le numéro de port est élevé, moins les portscan seront efficaces, puisqu'ils ne testent généralement qu'une fourchette de ports).
Donc voici les deux commandes qui vous permettront de générer les clés, et de connecter directement vos deux iBidules:
Vous devez remplacer:
* user : votre nom d'utilisateur (évitez root, désactivez-le dans sshd.conf)
* domain.net : l'adresse ip de votre box ou l'adresse fixe de votre équipement
* /path/to/ : l'emplacement des clés par rapport à la racine du disque
* 1234 : le port sur lequel ssh écoute
ssh-keygen -t rsa

cat /path/to/.ssh/id_dsa.pub | ssh -p 1234 [email protected] \

    "cat - >>/path/to.ssh/authorized_keys"
L'Apple TV 2 est sans doute le produit de chez Apple qui a le plus de potentiel, en matière de customization.
Un produit fonctionnant avec de la mémoire flash, toujours branché, et donc toujours allumé et connecté, tournant sous une base unix, il était tentant d'en faire un serveur web, et les résultats sont assez impressionnants.
Tout d'abord, il faut bien sûr jailbreaker son Apple TV, à l'aide de Seas0npass (evasi0n peut également le faire). Notez que si vous avez une Apple TV 3, il n'est pas possible de la jailbreaker, vous pouvez donc arrêter ici la lecture de ce billet.
Ensuite (et c'est un peu en dehors du sujet), je vous conseille d'installer ATV Flash Black, qui est normalement payant (à moins de passer par une baie bien connue située en Suède). Ce merveilleux package vous installera sur l'écran d’accueil l'application Medias, qui vous permet de mater tous les formats de films via des partages smb et afp.
C'est évidemment beaucoup plus clean qu'installer cette immonde daube qu'est XBMC. Après tout, on n'achète pas une Apple TV pour avoir une interface pourrie sur un logiciel buggué jusqu'à la moelle et d'une lenteur affligeante, n'est ce pas ?
Bon, la parenthèse est fermée, nous sommes prêt, votre Apple TV 2 est jailbreaké, l'accès ssh est donc opérationnel, et vous connaissez son adresse ip (sinon elle est dans le menu réglages > réseau).
Ne vous laissez pas impressionner par la longueur de ce tutoriel, ça ne vous prendra que 20 minutes.
1 - Sécuriser SSH un minimum
Comme tous les iBidules, les mots de passe des deux utilisateurs root et mobile son fixés sur "alpine". On ne va évidemment pas laisser ça comme ça.
Donc sur votre ordi, dans votre console ssh préférée, tapez:
2 - Installer tout le nécessaire pour un bon vieux serveur web
Comme nous ne voulons pas saturer la mémoire ram de notre Apple TV, nous n'installerons pas MySQL. De toutes façon c'est très compliqué à utiliser dans cet environnement, puisque notre version de php ne le supporte pas, nous utiliserons donc SQLite.
donc, ssh en root sur l'Apple TV, puis
Ensuite
Les packages nécessaires vont s'installer, il nous reste plus qu'à configurer tout ça.
3 - Vérifier que tout soit bien prêt à se lancer au démarrage
Je ne m’étalerai pas sur LaunchD dans ce billet, ça ferra l'objet d'un tutoriel à part.
Donc, toujours dans ssh:
Dans ce cas
<?xml version="1.0" encoding="UTF-8"?>
<!DOCTYPE plist PUBLIC "-//Apple Computer//DTD PLIST 1.0//EN" "http://www.apple.com/DTDs/PropertyList-1.0.dtd">
<plist version="1.0">
<dict>
<key>Label</key>
<string>net.lighttpd</string>
<key>OnDemand</key>
<false/>
<key>Program</key>
<string>/usr/sbin/lighttpd</string>
<key>ProgramArguments</key>
<array>
<string>/usr/sbin/lighttpd</string>
<string>-f /etc/www/lighttpd.conf</string>
<string>-D</string>
</array>
</dict>
</plist>
faites ctrl+x pour quitter, et y pour enregistrer.
4 - Configurer lighttpd
Vérifiez ensuite que le fichier lighttpd.conf soit bien dans /etc/www/. Si tel n'est pas le cas, faites un
Nous allons créer un dossier qui contiendra le répertoire http, dans l'arborescence de l'utilisateur mobile:
Vous pouvez maintenant vérifier votre config en faisant
vérifiez les lignes suivantes:
server.document-root = /private/var/mobile/Media/Sites/
index-file.names = ( "index.php","index.html")
vérifiez également que #dir-listing.activate = "enable"
soit bien commenté par un # pour éviter d'afficher le contenu des répertoires.
Configurez ensuite le fastCGI pour PHP:
fastcgi.server = ( ".php" =>
( "localhost" =>
( "socket" => "/tmp/php-fcgi.sock",
"bin-path" => "/private/var/stash/bin/php-cgi",
"max-procs" => 1,
"bin-environment" =>
( "PHP_FCGI_CHILDREN" => "2",
"PHP_FCGI_MAX_REQUESTS" => "1000" ))))
puis ctrl+x pour fermer et y pour enregistrer.
5 - Configurer php
Là c'est beaucoup plus simple, nous nous contenterons du minimum syndical.
et faites en sorte que votre fichier ressemble à peu près à ça:
upload_max_filesize = 14M
post_max_size = 14M
max_execution_time = 240
session.auto_start = 1
expose_php=off
6 - On prépare un petit test (en option)
Bien entendu il n'y a pas encore de fichier html ou php dans notre répertoire "Sites", vous pourrez les ajouter en installant netatalk ou pure-ftpd, pas besoin d'un tutoriel pour ça.
Si vous n'avez vraiment rien dans votre répertoire Sites, vous pouvez faire un petit test pour vérifier que tout fonctionne bien:
Et copiez la ligne suivante:
<? echo "php fonctionne"; ?>
ctrl+x et y
7 - On peut démarrer
Tout est près, nous allons donc demander à LaunchD de bien vouloir nous lancer lighttpd.
Histoire de vérifier que tout soit bien lancé, faites un "ps aux" et vérifiez qu'il y ai bien un process lighttpd qui soit lancé.
Vous pouvez maintenant taper dans votre navigateur http://(adresse ip de l'apple tv)
7 - En cas d'erreur
Si ça ne fonctionne pas (et que donc le process lighttpd n'est pas lancé lorsque vous vérifiez via "ps aux"), votre config est peut-être moisie, ou alors php plante lamentablement.
Essayez tout d'abord de lancer manuellement lighttpd:
Si le problème vient de php, le debug se ferra en faisant un
Voilà voilà, si vous êtes motivés, vous pouvez aussi configurer un serveur de mail.
Un produit fonctionnant avec de la mémoire flash, toujours branché, et donc toujours allumé et connecté, tournant sous une base unix, il était tentant d'en faire un serveur web, et les résultats sont assez impressionnants.
Tout d'abord, il faut bien sûr jailbreaker son Apple TV, à l'aide de Seas0npass (evasi0n peut également le faire). Notez que si vous avez une Apple TV 3, il n'est pas possible de la jailbreaker, vous pouvez donc arrêter ici la lecture de ce billet.
Ensuite (et c'est un peu en dehors du sujet), je vous conseille d'installer ATV Flash Black, qui est normalement payant (à moins de passer par une baie bien connue située en Suède). Ce merveilleux package vous installera sur l'écran d’accueil l'application Medias, qui vous permet de mater tous les formats de films via des partages smb et afp.
C'est évidemment beaucoup plus clean qu'installer cette immonde daube qu'est XBMC. Après tout, on n'achète pas une Apple TV pour avoir une interface pourrie sur un logiciel buggué jusqu'à la moelle et d'une lenteur affligeante, n'est ce pas ?
Bon, la parenthèse est fermée, nous sommes prêt, votre Apple TV 2 est jailbreaké, l'accès ssh est donc opérationnel, et vous connaissez son adresse ip (sinon elle est dans le menu réglages > réseau).
Ne vous laissez pas impressionner par la longueur de ce tutoriel, ça ne vous prendra que 20 minutes.
1 - Sécuriser SSH un minimum
Comme tous les iBidules, les mots de passe des deux utilisateurs root et mobile son fixés sur "alpine". On ne va évidemment pas laisser ça comme ça.
Donc sur votre ordi, dans votre console ssh préférée, tapez:
ssh root@(adresse ip)donc là vous tapez alpine pour vous connecter, puis
passwdLà vous tapez deux fois un bon mot de passe bien sécurisé, et ensuite on va aussi changer celui de mobile, donc
su mobileretapez alpine, puis
passwdon va vous redemander alpine, puis deux fois le même nouveau mot de passe, choisissez-en un différent, si possible.
2 - Installer tout le nécessaire pour un bon vieux serveur web
Comme nous ne voulons pas saturer la mémoire ram de notre Apple TV, nous n'installerons pas MySQL. De toutes façon c'est très compliqué à utiliser dans cet environnement, puisque notre version de php ne le supporte pas, nous utiliserons donc SQLite.
donc, ssh en root sur l'Apple TV, puis
apt-get updatepour avoir les bonnes versions qui vont bien.
Ensuite
apt-get install lighttpd php sqlite3 nano
Les packages nécessaires vont s'installer, il nous reste plus qu'à configurer tout ça.
3 - Vérifier que tout soit bien prêt à se lancer au démarrage
Je ne m’étalerai pas sur LaunchD dans ce billet, ça ferra l'objet d'un tutoriel à part.
Donc, toujours dans ssh:
cd /Library/LaunchDaemonsSi, comme c'est probable, vous n'avez aucun fichier contenant de prés ou de loin "lighttpd" dans son titre, rien n'est configuré.
ls
Dans ce cas
nano net.lighttpd.plistet copiez le contenu du fichier suivant:
<?xml version="1.0" encoding="UTF-8"?>
<!DOCTYPE plist PUBLIC "-//Apple Computer//DTD PLIST 1.0//EN" "http://www.apple.com/DTDs/PropertyList-1.0.dtd">
<plist version="1.0">
<dict>
<key>Label</key>
<string>net.lighttpd</string>
<key>OnDemand</key>
<false/>
<key>Program</key>
<string>/usr/sbin/lighttpd</string>
<key>ProgramArguments</key>
<array>
<string>/usr/sbin/lighttpd</string>
<string>-f /etc/www/lighttpd.conf</string>
<string>-D</string>
</array>
</dict>
</plist>
faites ctrl+x pour quitter, et y pour enregistrer.
4 - Configurer lighttpd
Vérifiez ensuite que le fichier lighttpd.conf soit bien dans /etc/www/. Si tel n'est pas le cas, faites un
find / -name lighttpd.confcréez le dossier www dans etc en faisant
mkdir /etc/wwwpuis déplacez le fichier avec
mv (ancien emplacement)/lighttpd.conf /etc/www/
Nous allons créer un dossier qui contiendra le répertoire http, dans l'arborescence de l'utilisateur mobile:
mkdir /private/var/mobile/Media/Sites
Vous pouvez maintenant vérifier votre config en faisant
nano /etc/www/lighttpd.conf
vérifiez les lignes suivantes:
server.document-root = /private/var/mobile/Media/Sites/
index-file.names = ( "index.php","index.html")
vérifiez également que #dir-listing.activate = "enable"
soit bien commenté par un # pour éviter d'afficher le contenu des répertoires.
Configurez ensuite le fastCGI pour PHP:
fastcgi.server = ( ".php" =>
( "localhost" =>
( "socket" => "/tmp/php-fcgi.sock",
"bin-path" => "/private/var/stash/bin/php-cgi",
"max-procs" => 1,
"bin-environment" =>
( "PHP_FCGI_CHILDREN" => "2",
"PHP_FCGI_MAX_REQUESTS" => "1000" ))))
puis ctrl+x pour fermer et y pour enregistrer.
5 - Configurer php
Là c'est beaucoup plus simple, nous nous contenterons du minimum syndical.
nano /usr/lib/php.ini
et faites en sorte que votre fichier ressemble à peu près à ça:
upload_max_filesize = 14M
post_max_size = 14M
max_execution_time = 240
session.auto_start = 1
expose_php=off
6 - On prépare un petit test (en option)
Bien entendu il n'y a pas encore de fichier html ou php dans notre répertoire "Sites", vous pourrez les ajouter en installant netatalk ou pure-ftpd, pas besoin d'un tutoriel pour ça.
Si vous n'avez vraiment rien dans votre répertoire Sites, vous pouvez faire un petit test pour vérifier que tout fonctionne bien:
nano /private/var/mobile/Media/Sites/index.php
Et copiez la ligne suivante:
<? echo "php fonctionne"; ?>
ctrl+x et y
7 - On peut démarrer
Tout est près, nous allons donc demander à LaunchD de bien vouloir nous lancer lighttpd.
launchctl load /Library/LaunchDaemons/net.lighttpd.plist

launchctl start net.lighttpd
Histoire de vérifier que tout soit bien lancé, faites un "ps aux" et vérifiez qu'il y ai bien un process lighttpd qui soit lancé.
Vous pouvez maintenant taper dans votre navigateur http://(adresse ip de l'apple tv)
7 - En cas d'erreur
Si ça ne fonctionne pas (et que donc le process lighttpd n'est pas lancé lorsque vous vérifiez via "ps aux"), votre config est peut-être moisie, ou alors php plante lamentablement.
Essayez tout d'abord de lancer manuellement lighttpd:
/usr/sbin/lighttpd -f /etc/www/lighttpd.conf -DVous aurez le message d'erreur et vous pourrez ainsi rectifier ce qui ne va pas.
Si le problème vient de php, le debug se ferra en faisant un
cat /var/log/syslogpour vérifier les messages d'erreur sur la console.
Voilà voilà, si vous êtes motivés, vous pouvez aussi configurer un serveur de mail.
I recently set up a full web server with one of the best device ever built: the Apple TV 2.
• I've got lighttpd and php, from cydia (those are quite good versions, but I'm planning to update php to get more features).
• I've got pure-ftpd from the excellent radare repository
There was only one thing who were missing: postfix.
This software is the most known MTA, and allows you to turn your atv2 to a fully functional mail server.
After some days of search, i realized that i would have to compile it by myself, straight on the appleTV2, and i'm now happy to release it to the world, through the radare repo:
Here is the .deb: postfix-2.9.3-arm-apple-darwin.deb
mirror link
To install it, just connect with ssh to your appleTV2, and then:
You can now navigate to /etc/postfix/ and start to setup the server. This can be a little bit hard for noobs, since there is a lot of option, but there is many tutorials to help you.
You would also need the plist file, to enable postfix on load: org.postfix.plist
edit : here is my config file (main.cf)
I use PHP as a MDA.
queue_directory = /var/spool/postfix
command_directory = /usr/sbin
daemon_directory = /usr/libexec/postfix
data_directory = /var/lib/postfix
message_size_limit = 30000000
alias_database = hash:/etc/postfix/aliases
alias_maps = hash:/etc/postfix/aliases
virtual_alias_maps = hash:/etc/postfix/virtual
mail_owner = (your postfix user)
default_privs = mobile
myhostname = (yourmachine.domain.com)
mydomain = (domain.com)
myorigin = $mydomain
unknown_local_recipient_reject_code = 550
relayhost = (IP adress of your ISP SMTP)
in_flow_delay = 2s
mailbox_command = /private/var/stash/bin/php (/path/to/php/command.php)
mail_spool_directory = /var/mobile/Mail/
smtpd_banner = $myhostname ESMTP $mail_name
debug_peer_level = 2
sendmail_path = /usr/sbin/sendmail
mailq_path = /usr/bin/mailq
setgid_group = _postfix
html_directory = no
manpage_directory = /usr/local/man
sample_directory = /etc/postfix
readme_directory = no
inet_protocols = all
• I've got lighttpd and php, from cydia (those are quite good versions, but I'm planning to update php to get more features).
• I've got pure-ftpd from the excellent radare repository
There was only one thing who were missing: postfix.
This software is the most known MTA, and allows you to turn your atv2 to a fully functional mail server.
After some days of search, i realized that i would have to compile it by myself, straight on the appleTV2, and i'm now happy to release it to the world, through the radare repo:
Here is the .deb: postfix-2.9.3-arm-apple-darwin.deb
mirror link
To install it, just connect with ssh to your appleTV2, and then:
wget http://cydia.radare.org/debs/postfix_2.9.3_iphoneos-arm.deb

dpkg -i postfix-2.9.3.deb
You can now navigate to /etc/postfix/ and start to setup the server. This can be a little bit hard for noobs, since there is a lot of option, but there is many tutorials to help you.
You would also need the plist file, to enable postfix on load: org.postfix.plist
edit : here is my config file (main.cf)
I use PHP as a MDA.
queue_directory = /var/spool/postfix
command_directory = /usr/sbin
daemon_directory = /usr/libexec/postfix
data_directory = /var/lib/postfix
message_size_limit = 30000000
alias_database = hash:/etc/postfix/aliases
alias_maps = hash:/etc/postfix/aliases
virtual_alias_maps = hash:/etc/postfix/virtual
mail_owner = (your postfix user)
default_privs = mobile
myhostname = (yourmachine.domain.com)
mydomain = (domain.com)
myorigin = $mydomain
unknown_local_recipient_reject_code = 550
relayhost = (IP adress of your ISP SMTP)
in_flow_delay = 2s
mailbox_command = /private/var/stash/bin/php (/path/to/php/command.php)
mail_spool_directory = /var/mobile/Mail/
smtpd_banner = $myhostname ESMTP $mail_name
debug_peer_level = 2
sendmail_path = /usr/sbin/sendmail
mailq_path = /usr/bin/mailq
setgid_group = _postfix
html_directory = no
manpage_directory = /usr/local/man
sample_directory = /etc/postfix
readme_directory = no
inet_protocols = all
English version
J'ai récemment mis en place un serveur web complet avec l'un des meilleur appareil jamais construit: l'Apple TV 2.
• J'ai installé lighttpd et php, à partir de cydia (ces versions sont assez bonnes, mais j'ai l'intention de mettre à jour php pour obtenir plus de fonctionnalités).
• J'ai installé pure-ftpd à partir de l'excellent repo radare
Il n'y avait qu'une seule chose qui manquait: postfix.
Ce logiciel est le plus connu des MTA, et vous permet de transformer votre ATV2 en un serveur de messagerie entièrement fonctionnel.
Après quelques jours de recherches infructueuses, j'ai réalisé que je devrais me le compiler moi-même, directement sur l'AppleTV 2, et je suis maintenant heureux de vous le faire partager, grace au repo de chez radare:
Voici le fichier .deb:postfix-2.9.3-arm-apple-darwin.deb
miroir
Pour l'installer, il suffit de se connecter en ssh sur votre AppleTV2, puis:
Vous pouvez maintenant naviguer dans /etc/postfix/ et commencer à configurer le serveur. C'est un peu difficile pour les noobs, car il ya beaucoup d'options, mais il y a de nombreux tutoriels pour vous aider.
Vous avez également besoin du fichier plist, afin de permettre le chargement de postfix: org.postfix.plist
J'ai récemment mis en place un serveur web complet avec l'un des meilleur appareil jamais construit: l'Apple TV 2.
• J'ai installé lighttpd et php, à partir de cydia (ces versions sont assez bonnes, mais j'ai l'intention de mettre à jour php pour obtenir plus de fonctionnalités).
• J'ai installé pure-ftpd à partir de l'excellent repo radare
Il n'y avait qu'une seule chose qui manquait: postfix.
Ce logiciel est le plus connu des MTA, et vous permet de transformer votre ATV2 en un serveur de messagerie entièrement fonctionnel.
Après quelques jours de recherches infructueuses, j'ai réalisé que je devrais me le compiler moi-même, directement sur l'AppleTV 2, et je suis maintenant heureux de vous le faire partager, grace au repo de chez radare:
Voici le fichier .deb:postfix-2.9.3-arm-apple-darwin.deb
miroir
Pour l'installer, il suffit de se connecter en ssh sur votre AppleTV2, puis:
wget http://cydia.radare.org/debs/postfix_2.9.3_iphoneos-arm.deb

dpkg-i postfix-2.9.3.deb
Vous pouvez maintenant naviguer dans /etc/postfix/ et commencer à configurer le serveur. C'est un peu difficile pour les noobs, car il ya beaucoup d'options, mais il y a de nombreux tutoriels pour vous aider.
Vous avez également besoin du fichier plist, afin de permettre le chargement de postfix: org.postfix.plist
The Apple TV 2 is probably the Apple product which has the most potential for customization.
A product who operate with flash memory, always powered on, and always connected, with an unix based os: it was tempting to turn it to a web server... and the results are quite impressive.
Firstly, it is obviously necessary to jailbreak the Apple TV, using Seas0npass (evasi0n can also do that). Please note that if you have an Apple TV 3, it is not possible to jailbreak it, you can stop reading this post here.
Then (and this is a bit off topic), I advise you to install ATV Flash Black, which is usually free (unless you go to a well known bay located in Sweden). This wonderful package will install you on the home screen a Media application, which lets you watch all movie formats via afp and smb shares.
This is obviously much more clean than installing this disgusting crap of XBMC. After all, you do not buy an Apple TV for a rotten interface running on a buggy and painfully slow software, isn't it?
Well, the bracket is closed, we are ready, your Apple TV 2 is jailbroken, ssh access is operational and you know its IP address (if not, go to settings> network).
Do not be fooled by the length of this tutorial, it will only take 20 minutes.
1 - Secure SSH a minimum
Like all iThings, the passwords of the two users root and mobile are set to "alpine". We cannot leave it like that.
So, on your computer in your favorite ssh console, type:
2 - Install everything needed for a web server
As we do not want to saturate the ram of our Apple TV, we will not install MySQL. By the way it is very complicated to use it in this environment, since our version of php does not support it, so we will use SQLite.
ssh as root on your Apple TV, then
Then
Required packages will be installed, now let set this up.
3 - Check that everything is well prepared to start at boot
I will not give great details about launchd in this post, it should be the topic of a separate tutorial.
So, now ssh:
In this case
<?xml version="1.0" encoding="UTF-8"?>
<!DOCTYPE plist PUBLIC "-//Apple Computer//DTD PLIST 1.0//EN" "http://www.apple.com/DTDs/PropertyList-1.0.dtd">
<plist version="1.0">
<dict>
<key>Label</key>
<string>net.lighttpd</string>
<key>OnDemand</key>
<false/>
<key>Program</key>
<string>/usr/sbin/lighttpd</string>
<key>ProgramArguments</key>
<array>
<string>/usr/sbin/lighttpd</string>
<string>-f /etc/www/lighttpd.conf</string>
<string>-D</string>
</array>
</dict>
</plist>
ctrl + x to exit and y to save.
4 - Configure lighttpd
Check that the lighttpd.conf file is on /etc/www/
If this is not the case,
We will now create a folder that will contain the http directory in the root directory of the mobile user:
You can now check your config by
check the following lines:
server.document-root = /private/var/mobile/Media/Sites/
index-file.names = ( "index.php","index.html")
also check that #dir-listing.activate = "enable"
is commented with a # to avoid displaying the contents of directories.
Then configure FastCGI for PHP:
fastcgi.server = ( ".php" =>
( "localhost" =>
( "socket" => "/tmp/php-fcgi.sock",
"bin-path" => "/private/var/stash/bin/php-cgi",
"max-procs" => 1,
"bin-environment" =>
( "PHP_FCGI_CHILDREN" => "2",
"PHP_FCGI_MAX_REQUESTS" => "1000" ))))
then ctrl + x to close and y to save.
5 - Configure php
This is much more simple, we will do the bare minimum:
and make sure that your file looks something like this:
upload_max_filesize = 14M
post_max_size = 14M
max_execution_time = 240
session.auto_start = 1
expose_php = off
6 - Prepare a small test (optional)
Of course there is still no html or php file in our "Sites" folder, you can add them by installing netatalk or pure-ftpd, we do not need a tutorial for this.
If you really have nothing in your Sites directory, you can do a small test to verify that everything works fine:
And copy the following line:
ctrl+x and y
7 - We can start
Everything is done, we can now ask launchd to kindly start lighttpd.
Just to check that everything is well, do a "ps aux" and check that there is a lighttpd process.
You can now type in your browser http://(ip address of the apple tv)
7 - In case of error
If it does not work (and therefore the process lighttpd is not running when you check via "ps aux"), your config may be moldy or php crashes miserably.
First try to manually start lighttpd:
If the problem is php, debug is shoed by a
Then, if you are still motivated, we can also configure a mail server.
A product who operate with flash memory, always powered on, and always connected, with an unix based os: it was tempting to turn it to a web server... and the results are quite impressive.
Firstly, it is obviously necessary to jailbreak the Apple TV, using Seas0npass (evasi0n can also do that). Please note that if you have an Apple TV 3, it is not possible to jailbreak it, you can stop reading this post here.
Then (and this is a bit off topic), I advise you to install ATV Flash Black, which is usually free (unless you go to a well known bay located in Sweden). This wonderful package will install you on the home screen a Media application, which lets you watch all movie formats via afp and smb shares.
This is obviously much more clean than installing this disgusting crap of XBMC. After all, you do not buy an Apple TV for a rotten interface running on a buggy and painfully slow software, isn't it?
Well, the bracket is closed, we are ready, your Apple TV 2 is jailbroken, ssh access is operational and you know its IP address (if not, go to settings> network).
Do not be fooled by the length of this tutorial, it will only take 20 minutes.
1 - Secure SSH a minimum
Like all iThings, the passwords of the two users root and mobile are set to "alpine". We cannot leave it like that.
So, on your computer in your favorite ssh console, type:
ssh root@(ip)Type alpine to log in and
passwdThen type twice an old good very secure password, and then we will also the change the one for mobile, so
su mobileretype alpine and
passwdit will ask you again alpine, then twice again the same password, choose a different one if possible.
2 - Install everything needed for a web server
As we do not want to saturate the ram of our Apple TV, we will not install MySQL. By the way it is very complicated to use it in this environment, since our version of php does not support it, so we will use SQLite.
ssh as root on your Apple TV, then
apt-get updateto get the most recent versions.
Then
apt-get install lighttpd php sqlite3 nano
Required packages will be installed, now let set this up.
3 - Check that everything is well prepared to start at boot
I will not give great details about launchd in this post, it should be the topic of a separate tutorial.
So, now ssh:
cd /Library/LaunchDaemonsYou will likely have no file containing near or far "lighttpd" in its title, which means that nothing is configured.
ls
In this case
nano net.lighttpd.plistand copy the contents of the following file:
<?xml version="1.0" encoding="UTF-8"?>
<!DOCTYPE plist PUBLIC "-//Apple Computer//DTD PLIST 1.0//EN" "http://www.apple.com/DTDs/PropertyList-1.0.dtd">
<plist version="1.0">
<dict>
<key>Label</key>
<string>net.lighttpd</string>
<key>OnDemand</key>
<false/>
<key>Program</key>
<string>/usr/sbin/lighttpd</string>
<key>ProgramArguments</key>
<array>
<string>/usr/sbin/lighttpd</string>
<string>-f /etc/www/lighttpd.conf</string>
<string>-D</string>
</array>
</dict>
</plist>
ctrl + x to exit and y to save.
4 - Configure lighttpd
Check that the lighttpd.conf file is on /etc/www/
If this is not the case,
find / -name lighttpd.confcreate www in the etc folder by
mkdir /etc/wwwthen move the file
mv (old location)/lighttpd.conf /etc/www/
We will now create a folder that will contain the http directory in the root directory of the mobile user:
mkdir /private/var/mobile/Media/Sites
You can now check your config by
nano /etc/www/lighttpd.conf
check the following lines:
server.document-root = /private/var/mobile/Media/Sites/
index-file.names = ( "index.php","index.html")
also check that #dir-listing.activate = "enable"
is commented with a # to avoid displaying the contents of directories.
Then configure FastCGI for PHP:
fastcgi.server = ( ".php" =>
( "localhost" =>
( "socket" => "/tmp/php-fcgi.sock",
"bin-path" => "/private/var/stash/bin/php-cgi",
"max-procs" => 1,
"bin-environment" =>
( "PHP_FCGI_CHILDREN" => "2",
"PHP_FCGI_MAX_REQUESTS" => "1000" ))))
then ctrl + x to close and y to save.
5 - Configure php
This is much more simple, we will do the bare minimum:
nano /usr/lib/php.ini
and make sure that your file looks something like this:
upload_max_filesize = 14M
post_max_size = 14M
max_execution_time = 240
session.auto_start = 1
expose_php = off
6 - Prepare a small test (optional)
Of course there is still no html or php file in our "Sites" folder, you can add them by installing netatalk or pure-ftpd, we do not need a tutorial for this.
If you really have nothing in your Sites directory, you can do a small test to verify that everything works fine:
nano /private/var/mobile/Media/Sites/index.php
And copy the following line:
ctrl+x and y
7 - We can start
Everything is done, we can now ask launchd to kindly start lighttpd.
launchctl load /Library/LaunchDaemons/net.lighttpd.plist

launchctl start net.lighttpd
Just to check that everything is well, do a "ps aux" and check that there is a lighttpd process.
You can now type in your browser http://(ip address of the apple tv)
7 - In case of error
If it does not work (and therefore the process lighttpd is not running when you check via "ps aux"), your config may be moldy or php crashes miserably.
First try to manually start lighttpd:
/usr/sbin/lighttpd -f /etc/www/lighttpd.conf -DYou can check error messages and you can correct what is wrong.
If the problem is php, debug is shoed by a
cat /var/log/syslogto check the error messages on the console.
Then, if you are still motivated, we can also configure a mail server.
Please note that this tutorial is totally worthless since the Lion beta does not include most of the feature included in the final version.
It's just for fun.
What you need:
- An intel core duo/solo Mac computer (MacBook, Mac mini...) running Snow Leopard
- A Mac OS X Lion Developer Preview 1 copy (there's a bay full of pirates that can be useful...)
- Xar 1.5.2 binaries
- One hour
Optional:
- Developer tools, to compile Xar 1.5.2
- A Snow Leopard disk image
- An external hard drive, to backup your computer
What you DON'T need, at all:
- a DVD drive
- a USB drive
- another Mac
Step 1 (optional)
Do a full backup of your computer with TimeMachine.
Step 2
Depending on your drive capabilities, use disk utility to partition your drive that way:
- 2 partitions of 9Gb at the end of your drive, the first one for a fallback emergency Snow Leopard installer, the second one for the Lion installer
- 2 partitions with the remaining space, the first one being your current snow leopard partition, the second one being your target for the Lion install.
Step 3
- Restore the first 9Gb partition with your Mac OS X 10.6 Snow Leopard disk image, using disk utility.
- Restore the second 9Gb partition with your MAC OS X 10.7 Lion Developer Preview 1 disk image, using disk utility.
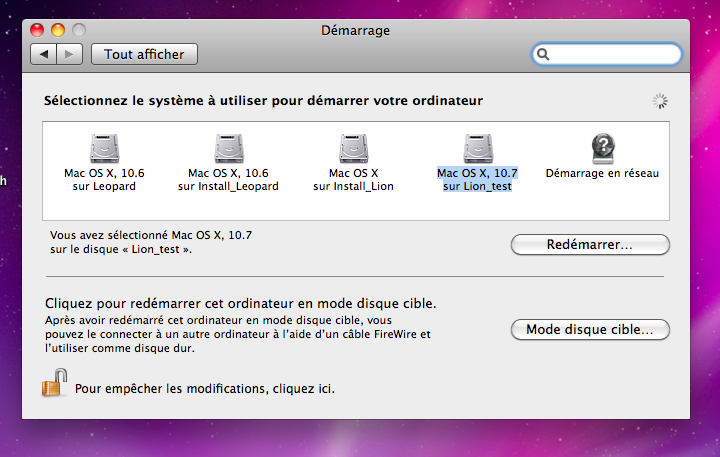
If anything goes well, you will be able to see your 3 startup volumes in System Preferences > startup
- Your current Leopard install
- Your two system installers
Step 4 (not necessary, I think, if you have downloaded my compiled version of Xar)
Assuming that you have Xcode and dev tools installed, download the Xar source code, extract it, and compile it, by using terminal.app
Step 5
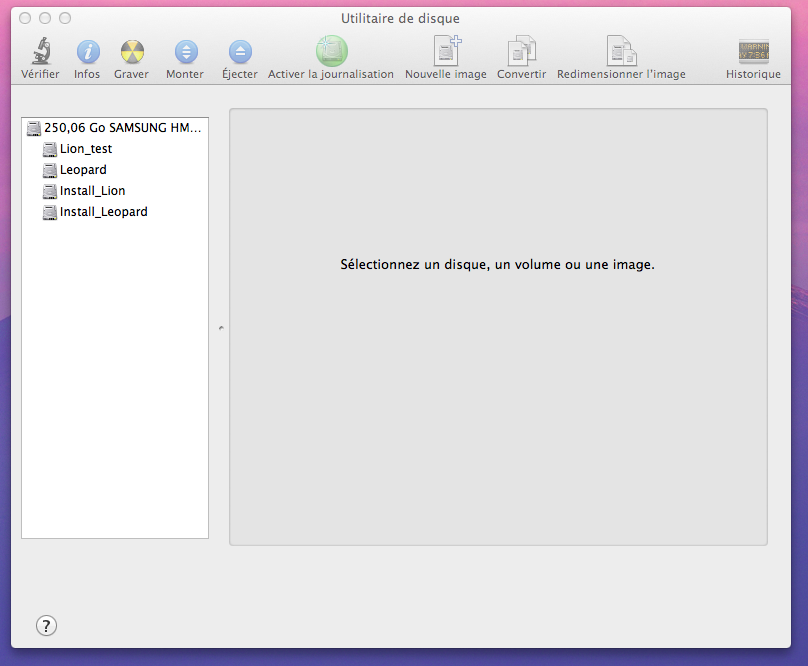
This step requires some command-line stuff, and in order to keep that tutorial simple, you should change the name of your partitions:
On the finder, Make a right-click > properties on each partition and change their names to match the following strings:
Leopard Your current Leopard partition
Lion_test Your Lion target partition
install_Leopard Snow Leopard Installer
install_Lion Lion Installer
Keep in mind that you will be able to choose your startup partition at boot time while holding the alt (command) key when you hear the Mac startup chord. You keep secured at any time, with this tutorial
We will now edit the Lion installer in order to prevent any system checking (Ram, processor, and other stuff)
Go to terminal.app and type "su" to get root privileges (if root is not activated, then activate it)
type the following commands, one line after one:
Download this file and unzip it.
In Finder, go to the workingdir, on your desktop, and replace the Distribution file with this one.
In terminal, type:
We now have updated the installer (who checks your system at the install step) , but don't close your terminal yet, we also need to delete 1 file who are used to check your system at the boot step
Step 6
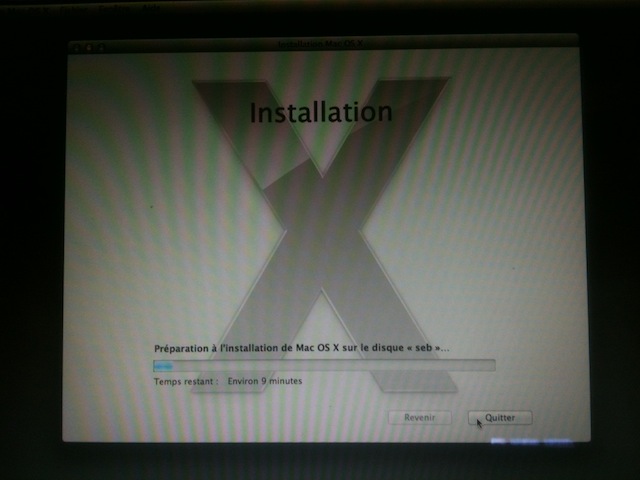
Reboot your Mac on the Install_Lion partition
Step 7
You should now be able to install Lion without any problem
Step 8
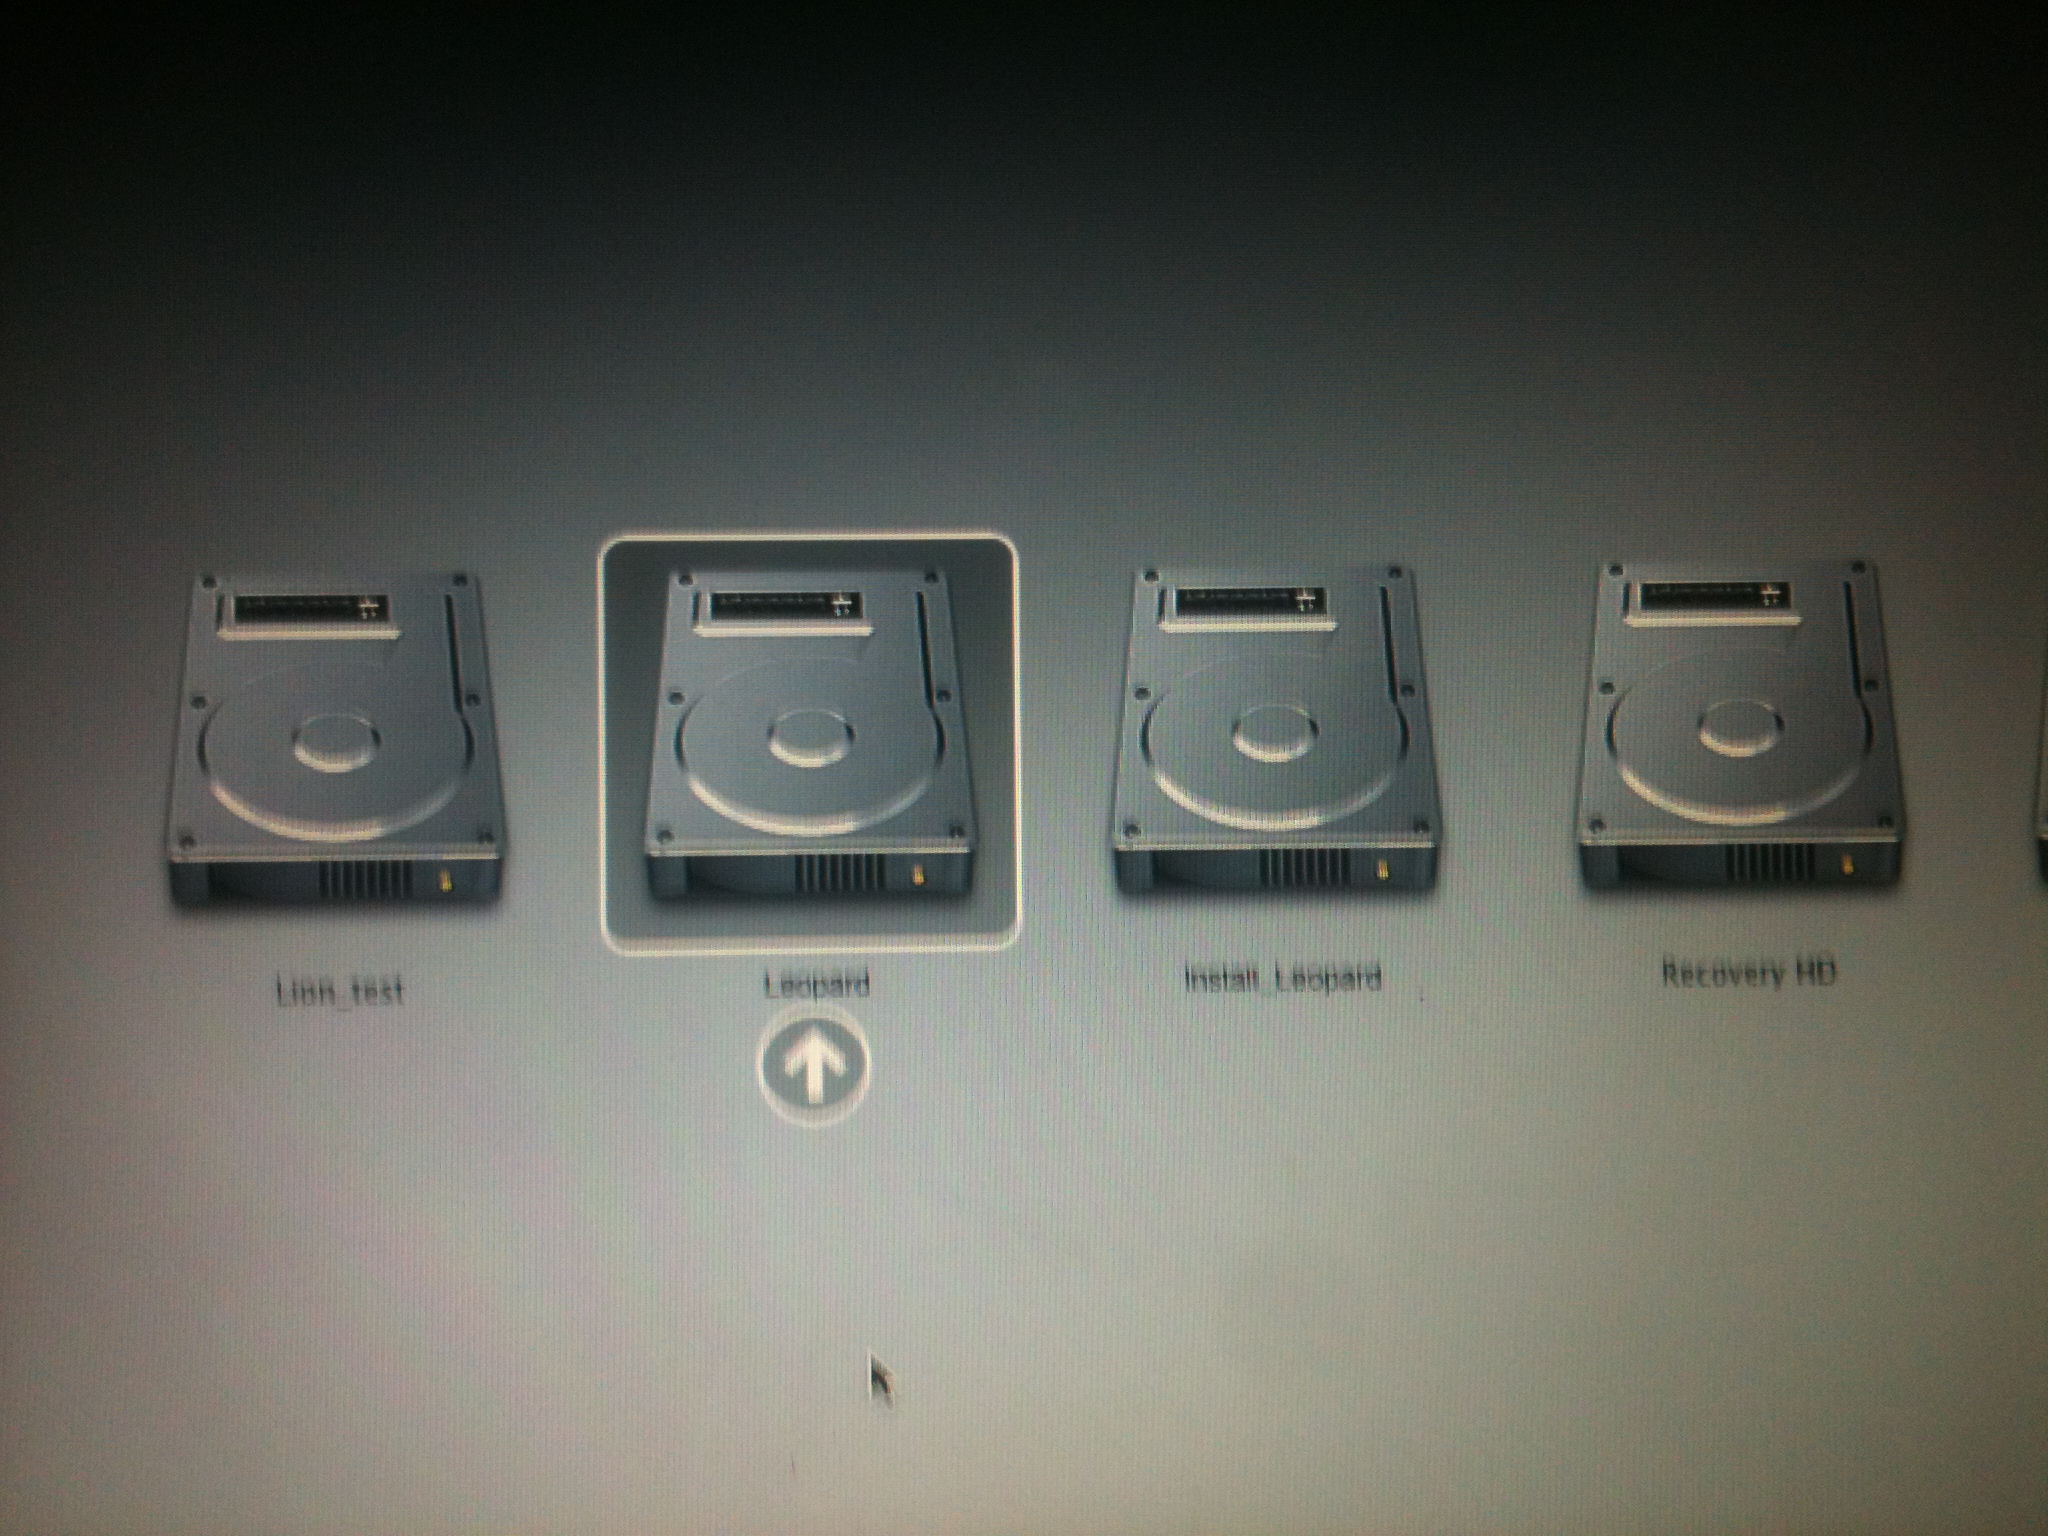
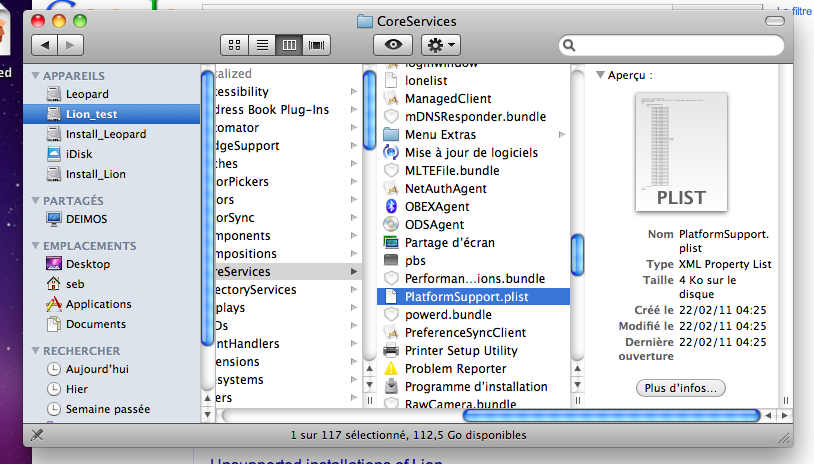
Lion will refuse to boot, due to this same PlatformSupport.plist

Computer is turned off, press the start button while holding "alt" ("command" on US keyboards), you will see a list of bootable partition.
Choose your Snow Leopard partition.
Step 9
Open terminal.app, and type the following commands:
or delete it via Finder
Step 10
Change your startup Volume to "Lion_test"
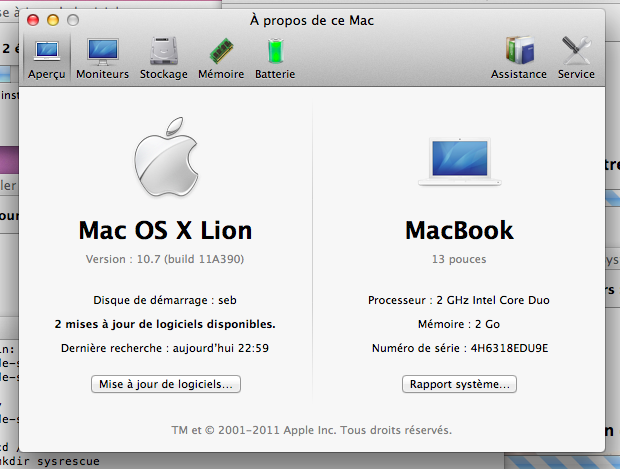
et voilà... You are now running Mac OS X Lion
Step 11
You should clean your drive with disk utility by deleting your Snow Leopard partition and your install_Lion partition
It's just for fun.
What you need:
- An intel core duo/solo Mac computer (MacBook, Mac mini...) running Snow Leopard
- A Mac OS X Lion Developer Preview 1 copy (there's a bay full of pirates that can be useful...)
- Xar 1.5.2 binaries
- One hour
Optional:
- Developer tools, to compile Xar 1.5.2
- A Snow Leopard disk image
- An external hard drive, to backup your computer
What you DON'T need, at all:
- a DVD drive
- a USB drive
- another Mac
Step 1 (optional)
Do a full backup of your computer with TimeMachine.
Step 2
Depending on your drive capabilities, use disk utility to partition your drive that way:
- 2 partitions of 9Gb at the end of your drive, the first one for a fallback emergency Snow Leopard installer, the second one for the Lion installer
- 2 partitions with the remaining space, the first one being your current snow leopard partition, the second one being your target for the Lion install.
Step 3
- Restore the first 9Gb partition with your Mac OS X 10.6 Snow Leopard disk image, using disk utility.
- Restore the second 9Gb partition with your MAC OS X 10.7 Lion Developer Preview 1 disk image, using disk utility.
If anything goes well, you will be able to see your 3 startup volumes in System Preferences > startup
- Your current Leopard install
- Your two system installers
Step 4 (not necessary, I think, if you have downloaded my compiled version of Xar)
Assuming that you have Xcode and dev tools installed, download the Xar source code, extract it, and compile it, by using terminal.app
cd {Xar folder}

./configure

make

make install
Step 5
This step requires some command-line stuff, and in order to keep that tutorial simple, you should change the name of your partitions:
On the finder, Make a right-click > properties on each partition and change their names to match the following strings:
Leopard Your current Leopard partition
Lion_test Your Lion target partition
install_Leopard Snow Leopard Installer
install_Lion Lion Installer
Keep in mind that you will be able to choose your startup partition at boot time while holding the alt (command) key when you hear the Mac startup chord. You keep secured at any time, with this tutorial
We will now edit the Lion installer in order to prevent any system checking (Ram, processor, and other stuff)
Go to terminal.app and type "su" to get root privileges (if root is not activated, then activate it)
type the following commands, one line after one:
mkdir ~/Desktop/workingdir

cp /Volumes/install_Lion/Packages/OSInstall.mpkg /Users//Desktop/workingdir/

xar -x -f /Users//Desktop/workingdir/OSInstall.mpkg
Download this file and unzip it.
In Finder, go to the workingdir, on your desktop, and replace the Distribution file with this one.
In terminal, type:
xar -c -f /Users//Desktop/workingdir/OSInstall.mpkg *

mv ~/Desktop/workingdir/OSInstall.mpkg /Volumes/install_Lion/Packages/
We now have updated the installer (who checks your system at the install step) , but don't close your terminal yet, we also need to delete 1 file who are used to check your system at the boot step
rm /Volumes/System/CoreServices/PlatformSupport.plist
Step 6
Reboot your Mac on the Install_Lion partition
Step 7
You should now be able to install Lion without any problem
Step 8
Lion will refuse to boot, due to this same PlatformSupport.plist
Computer is turned off, press the start button while holding "alt" ("command" on US keyboards), you will see a list of bootable partition.
Choose your Snow Leopard partition.
Step 9
Open terminal.app, and type the following commands:
su

rm /Volumes/Lion_test/System/Library/CoreServices/PlatformSupport.plist
or delete it via Finder
Step 10
Change your startup Volume to "Lion_test"
et voilà... You are now running Mac OS X Lion
Step 11
You should clean your drive with disk utility by deleting your Snow Leopard partition and your install_Lion partition

Edit (16 mai 2012): Ce tutoriel est un peu daté, il peut encore servir, mais désormais,je vous conseille simplement de passer chez free mobile. Vous aurez du tethering sans avoir à jailbreaker votre téléphone.
Ceux qui ont jailbreaké leur iPhone sous iOS 4 ont eu la mauvaise surprise de voir disparaitre le tethering officiel, qui était auparavant très simple à activer (via un fichier de config disponible sur http://help.benm.at)
Pas de panique, tout ce dont vous avez besoin est de votre iPhone jailbreaké et désimlocké avec Ultrasn0w, d'un éditeur de texte, tel iFile, qui ferra très bien l'affaire, et dans 5 minutes, vous pourrez utiliser la connexion internet de votre iPhone directement sur votre ordinateur.
Avertissement initial Source: wikipedia, orange, etc
Le jaikbreak n'est pas illégal. Personne n'a jamais été condamné pour avoir modifié un appareil dont il était propriétaire.
Le jailbreak ne peut pas casser l'appareil. En effet, ce n'est qu'une modification logicielle qui peut-être annulée par une restauration à l'origine de l'iOS sur iTunes (il n'y a aucune modification irréversible). Un iPhone jailbreaké dont l'iOS a été restauré, est un iPhone parfaitement identique à ceux qui n'ont jamais été jailbreakés (lors d'un retour en garantie, Apple n'est pas capable de savoir si l'appareil a été jailbreaké auparavant).
En juillet 2010, la Bibliothèque du Congrès des États-Unis a décidé de permettre aux possesseurs d'iPhones de contourner le verrou d'Apple afin de télécharger des applications n'ayant pas reçu l'approbation de la compagnie.
Concernant le tethering, il constitue un "usage modem" qui ne fait généralement pas partie de votre forfait iPhone orange (voir conditions générales internet max orange) et donc, si vous abusez de cet usage, il est tout à fait possible que vous soyez facturés en hors-forfait, même si je n'ai pas eu echo de ce type de problème, et je ne pense pas non plus qu'orange vérifie tous les paquets transitants sur son réseau 3G afin de débusquer les tricheurs. Mais bon, vous voilà prévenus.
Concernant les différentes méthodes de tethering
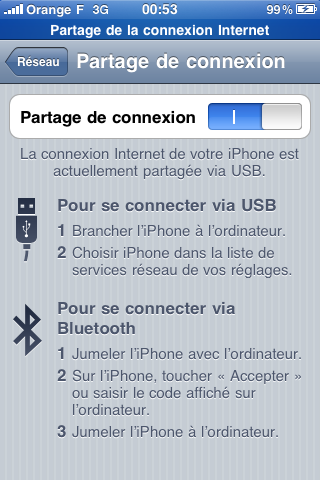
Le partage de connexion (tethering) intégré au système est le plus rapide et le moins gourmand en ressource.
Sur iPhone jailbreaké vous trouvez tout un tas d'applications telles "MyWi", qui est non seulement payante (un comble pour une application dispo sur Cydia) mais qui est en plus très lente, et vous ruine la batterie très rapidement. Je déconseille donc fortement de l'utiliser.
Le tethering dit "officiel", c'est à dire intégré au système, est facile à mettre en oeuvre, efficace, il suffit juste de modifier quelques fichiers de configuration, et il fonctionne en plus en USB ce qui vous permet d'économiser la batterie de votre téléphone.
Let's go
Vous avez 3 fichiers à modifier, cette méthode est valable pour orange france, et avec un minimum d'adaptation, vous pourrez l'utiliser pour les autres opérateurs (voir à la fin de ce post).
Premier fichier
allez jusqu'au fichier "/private/var/mobile/Library/Preferences/com.apple.MobileInternetSharing.plist"
qui est le fichier de préférence pour le tethering
vous devez le modifier afin qu'il ressemble à ceci (modifications en gras):
<?xml version="1.0" encoding="UTF-8"?>
<!DOCTYPE plist PUBLIC "-//Apple//DTD PLIST 1.0//EN" "http://www.apple.com/DTDs/PropertyList-1.0.dtd">
<plist version="1.0">
<dict>
<key>State</key>
<integer>1023</integer>
<key>Version</key>
<integer>2</integer>
</dict>
</plist>
Le fait de modifier la clé "State" de 1020 à 1023 va faire apparaitre le toggle d'activation du tethering dans les réglages. N'y allez pas tout de suite, si vous n'avez pas modifié les fichiers suivants, le système remettra l'état à 1020 et le bouton disparaitra.
Deuxième fichier
Ensuite, modifions "/private/var/Managed Preferences/mobile/com.apple.managedCarrier.plist"
qui est le fichier de configuration réseau de votre opérateur, voilà ce que vous devez obtenir (modifications en gras):
<?xml version="1.0" encoding="UTF-8"?>
<!DOCTYPE plist PUBLIC "-//Apple//DTD PLIST 1.0//EN" "http://www.apple.com/DTDs/PropertyList-1.0.dtd">
<plist version="1.0">
<dict>
<key>apns</key>
<array>
<dict>
<key>apn</key>
<string>orange.fr</string>
<key>password</key>
<string>orange</string>
<key>type-mask</key>
<integer>53</integer>
<key>username</key>
<string>orange</string>
</dict>
</array>
</dict>
</plist>
La clé "type-mask" va vous permettre d'ici peu d'activer le tethering pour cette connexion.
Troisième fichier
Soyez attentif, concernant le dernier fichier "/private/var/preferences/SystemConfiguration/preferences.plist"
Toute erreur pourrait faire planter votre téléphone. J'ai volontairement évité de recopier tout le fichier car ce dernier comporte des clés hexadécimales propres à chaque téléphone et que vous n'avez de toutes façons pas besoin de modifier.
Naviguez jusqu'aux lignes suivantes:
<dict>
<key>AllowNoDNS</key>
<integer>1</integer>
<key>apn</key>
<string>orange.fr</string>
et ajoutez immédiatement après:
<key>type-mask</key>
<integer>53</integer>
Redémarrez votre iPhone, allez dans "Réglages>Général>Réseau", et profitez de votre partage de connexion en 3G !
Problèmes connus
• Si les fichiers ne ressemblent absolument pas à ce que j'ai décrit, ne les modifiez pas, il vous faudra installer un profil réseau que vous pourrez trouver sur http://help.benm.at.
Malheureusement ce site va vous rediriger sur une page de blog, vous devrez vous y connecter avec Mobile Safari, ou avec votre navigateur en changeant l'user-agent en "mobile safari".
• Si vous êtes chez orange, voici mon profil réseau.
• Une fois le profil réseau téléchargé, vous ne pourrez pas l'installer avec mobile safari, cette option est désormais impossible sur iOS 4. Vous devez vous l'envoyer par mail, et l'installer depuis l'application mail de votre iPhone.
• Notez bien que votre iPhone doit être débloqué avec UltraSn0w, et donc vous devez avoir une ancienne version du baseband (firmware gérant le modem), les nouvelles versions étant en théorie non-déblocables. Dans tous les cas, le downgrade (passage à une version antérieure), que ce soit du baseband ou du système, est TOUJOURS possible. Je n'ai pas le temps de le documenter ici, mais il existe de très bon tutoriels sur ce sujet.
Si vous rencontrez des difficultés, vous pouvez m'en faire part dans les commentaires
Ceux qui ont jailbreaké leur iPhone sous iOS 4 ont eu la mauvaise surprise de voir disparaitre le tethering officiel, qui était auparavant très simple à activer (via un fichier de config disponible sur http://help.benm.at)
Pas de panique, tout ce dont vous avez besoin est de votre iPhone jailbreaké et désimlocké avec Ultrasn0w, d'un éditeur de texte, tel iFile, qui ferra très bien l'affaire, et dans 5 minutes, vous pourrez utiliser la connexion internet de votre iPhone directement sur votre ordinateur.
Avertissement initial Source: wikipedia, orange, etc
Le jaikbreak n'est pas illégal. Personne n'a jamais été condamné pour avoir modifié un appareil dont il était propriétaire.
Le jailbreak ne peut pas casser l'appareil. En effet, ce n'est qu'une modification logicielle qui peut-être annulée par une restauration à l'origine de l'iOS sur iTunes (il n'y a aucune modification irréversible). Un iPhone jailbreaké dont l'iOS a été restauré, est un iPhone parfaitement identique à ceux qui n'ont jamais été jailbreakés (lors d'un retour en garantie, Apple n'est pas capable de savoir si l'appareil a été jailbreaké auparavant).
En juillet 2010, la Bibliothèque du Congrès des États-Unis a décidé de permettre aux possesseurs d'iPhones de contourner le verrou d'Apple afin de télécharger des applications n'ayant pas reçu l'approbation de la compagnie.
Concernant le tethering, il constitue un "usage modem" qui ne fait généralement pas partie de votre forfait iPhone orange (voir conditions générales internet max orange) et donc, si vous abusez de cet usage, il est tout à fait possible que vous soyez facturés en hors-forfait, même si je n'ai pas eu echo de ce type de problème, et je ne pense pas non plus qu'orange vérifie tous les paquets transitants sur son réseau 3G afin de débusquer les tricheurs. Mais bon, vous voilà prévenus.
Concernant les différentes méthodes de tethering
Le partage de connexion (tethering) intégré au système est le plus rapide et le moins gourmand en ressource.
Sur iPhone jailbreaké vous trouvez tout un tas d'applications telles "MyWi", qui est non seulement payante (un comble pour une application dispo sur Cydia) mais qui est en plus très lente, et vous ruine la batterie très rapidement. Je déconseille donc fortement de l'utiliser.
Le tethering dit "officiel", c'est à dire intégré au système, est facile à mettre en oeuvre, efficace, il suffit juste de modifier quelques fichiers de configuration, et il fonctionne en plus en USB ce qui vous permet d'économiser la batterie de votre téléphone.
Let's go
Vous avez 3 fichiers à modifier, cette méthode est valable pour orange france, et avec un minimum d'adaptation, vous pourrez l'utiliser pour les autres opérateurs (voir à la fin de ce post).
Premier fichier
allez jusqu'au fichier "/private/var/mobile/Library/Preferences/com.apple.MobileInternetSharing.plist"
qui est le fichier de préférence pour le tethering
vous devez le modifier afin qu'il ressemble à ceci (modifications en gras):
<?xml version="1.0" encoding="UTF-8"?>
<!DOCTYPE plist PUBLIC "-//Apple//DTD PLIST 1.0//EN" "http://www.apple.com/DTDs/PropertyList-1.0.dtd">
<plist version="1.0">
<dict>
<key>State</key>
<integer>1023</integer>
<key>Version</key>
<integer>2</integer>
</dict>
</plist>
Le fait de modifier la clé "State" de 1020 à 1023 va faire apparaitre le toggle d'activation du tethering dans les réglages. N'y allez pas tout de suite, si vous n'avez pas modifié les fichiers suivants, le système remettra l'état à 1020 et le bouton disparaitra.
Deuxième fichier
Ensuite, modifions "/private/var/Managed Preferences/mobile/com.apple.managedCarrier.plist"
qui est le fichier de configuration réseau de votre opérateur, voilà ce que vous devez obtenir (modifications en gras):
<?xml version="1.0" encoding="UTF-8"?>
<!DOCTYPE plist PUBLIC "-//Apple//DTD PLIST 1.0//EN" "http://www.apple.com/DTDs/PropertyList-1.0.dtd">
<plist version="1.0">
<dict>
<key>apns</key>
<array>
<dict>
<key>apn</key>
<string>orange.fr</string>
<key>password</key>
<string>orange</string>
<key>type-mask</key>
<integer>53</integer>
<key>username</key>
<string>orange</string>
</dict>
</array>
</dict>
</plist>
La clé "type-mask" va vous permettre d'ici peu d'activer le tethering pour cette connexion.
Troisième fichier
Soyez attentif, concernant le dernier fichier "/private/var/preferences/SystemConfiguration/preferences.plist"
Toute erreur pourrait faire planter votre téléphone. J'ai volontairement évité de recopier tout le fichier car ce dernier comporte des clés hexadécimales propres à chaque téléphone et que vous n'avez de toutes façons pas besoin de modifier.
Naviguez jusqu'aux lignes suivantes:
<dict>
<key>AllowNoDNS</key>
<integer>1</integer>
<key>apn</key>
<string>orange.fr</string>
et ajoutez immédiatement après:
<key>type-mask</key>
<integer>53</integer>
Redémarrez votre iPhone, allez dans "Réglages>Général>Réseau", et profitez de votre partage de connexion en 3G !
Problèmes connus
• Si les fichiers ne ressemblent absolument pas à ce que j'ai décrit, ne les modifiez pas, il vous faudra installer un profil réseau que vous pourrez trouver sur http://help.benm.at.
Malheureusement ce site va vous rediriger sur une page de blog, vous devrez vous y connecter avec Mobile Safari, ou avec votre navigateur en changeant l'user-agent en "mobile safari".
• Si vous êtes chez orange, voici mon profil réseau.
• Une fois le profil réseau téléchargé, vous ne pourrez pas l'installer avec mobile safari, cette option est désormais impossible sur iOS 4. Vous devez vous l'envoyer par mail, et l'installer depuis l'application mail de votre iPhone.
• Notez bien que votre iPhone doit être débloqué avec UltraSn0w, et donc vous devez avoir une ancienne version du baseband (firmware gérant le modem), les nouvelles versions étant en théorie non-déblocables. Dans tous les cas, le downgrade (passage à une version antérieure), que ce soit du baseband ou du système, est TOUJOURS possible. Je n'ai pas le temps de le documenter ici, mais il existe de très bon tutoriels sur ce sujet.
Si vous rencontrez des difficultés, vous pouvez m'en faire part dans les commentaires
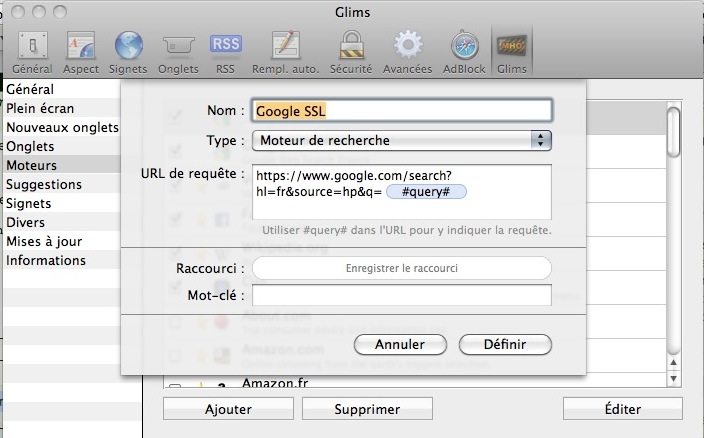
Ceux qui utilisent l'excellent plug-in Glims sous Safari peuvent dorénavant bénéficier du cryptage SSL que propose depuis peu Google.
Il vous suffit pour cela d'aller dans les paramètres de Glims, et de rentrer la chaîne suivante:
Il vous suffit pour cela d'aller dans les paramètres de Glims, et de rentrer la chaîne suivante:
https://www.google.com/search?hl=fr&source=hp&q=,#query#
Please note that this method is the only one which will allows you to keep your preferred networks saved.
All the other methods are bullshit.
Devices: iPhone 3G/3GS
OS: up to 3.1.3
Symptoms: no wifi network / unable to join any network
First step: Localization
You should proceed by connecting your computer to your iPhone via the netatalk protocol, which is the fastest and the easier way to modify files directly on your iPhone memory. Your wifi is not working, so you will have to connect your devices via bluetooth.
You can also use iFile (check cydia) or the Mobile Terminal, but it will be a little bit longer.
So, the first step is to locate the file "/Library/Preferences/SystemConfiguration/com.apple.wifi.plist" which, as its name stands for, is dedicated to wifi.
Second step: Modification
Most of the wifi issues are due to a couple of keys in the plist file which are set with the wrong parameter.
Let's modify it.
Locate the first one: <key>AllowEnable</key>
…and set it to <true/>
Now locate the second one: <key>JoinMode</key>
…and set it to <string>Automatic</string>
Save, and Reboot, it should work.
Last Step: it's still not working
Make a backup of your com.apple.wifi.plist file somewhere on your iPhone, and reset the network parameters on the Settings/General/(Last Tab), you will have to edit your new file, by copying the "List of known networks" hierarchy from the backed-up file to the new one, and you will not lose even one of them.
If you magnify the TextEdit icon, you will be able to read the full length text of one of the most impressive Apple TV ad ever.


I've recently bought the Numark iDJ2, and it works pretty well, I use it to mix in my favorite restaurant, and I only have to bring my iDJ2 and my ipod, instead of a ton of cds.
But I must admit that using this product was at first a little bit disappointing. AAC support were very poor, and the timecode was lagging during playback. Checking the numark website told me that a firmware update (v 1.09a) was available, with many good stuff on it.
There were a little problem: I'm a mac user.
And a simple update, that was supposed to last five minutes, became a nightmare, for this single reason.
It's a little bit weird for a product supposed to handle Apple technologies such as HFS file-system (wich is managed without any problem on a regular use) be unable to understand this same file-system when trying to update the iDJ2.
And it's very annoying, when after a couple of hours, you plug your specially-bought USB key to have a death screen that informs you there is not valid update on it.
So after having suffered a few hours, I've decided to help you saving your time and keep your karma at a good level.
You want to update your iDJ2 with your mac ? GOOD NEWS ! It's possible, and here is the rules:
1) You download the update.
2) You need an USB key, no update can be done with an iPod or an external drive (I've tried with my iPod, with an external HD, and an external DVD drive, I love learning things ;-)
3) You must format your USB key with FAT32 file-system and only this one. You can do that with the Disk Utility wich is in the Utility folder of your Applications folder in Mac OS X. If you can't use Disk Utility you will need to do it throught the command line (Google will tell you how to do).
4) copy the update file (iDJ2_v1_09a.upg) on the USB key, and to be sure that the Finder will not create hidden files that the iDJ2 would take, by mistake, to be the update, we will use the terminal to do that.
open the Terminal, and assuming that the update file is on your desktop, and that your USB key is labelled as "HELLO", type the following command:
cp ~/Desktop/iDJ2_v1_09a.upg /Volumes/HELLO/DJ2_v1_09a.upg
don't open a finder window pointing your USB key, the Finder could take this occasion to create ugly hidden files on it.
5) You can verify that your USB key is holding one, and only one file, with this command:
ls -al /Volumes/HELLO
If it's not the case, you should use rm /Volumes/HELLO/[the name of a file you want to delete] to fix it
6) Start the Update process by following the Numark instructions, as an honest PC user would do.
7) Play AAC music and be amazed by the beauty of the non-lagging timecode.
Les pages de ce site (et notamment les mémos) devraient pâtir assez longtemps de mon récent passage à l'UTF-8.
En effet, histoire de me mettre à l'abris de tout problème d'encodage éventuel, j'ai décidé de passer à cette norme plus internationale qui permet, quel luxe, de dire bonjour en arabe et en japonais:
السلام عليكم
を編集中
Seulement voilà, c'était beaucoup plus difficile à mettre en oeuvre que je ne l'avais imaginé, et je dois reprendre tous mes textes pour les convertir manuellement, je vous garantit qu'afficher correctement les 3 langues de ce texte est pour moi un véritable plaisir quand je vois le temps que j'ai passé à farfouiller sur les forums.
En gros, je résume (allez je m'essaye à un petit tutoriel):
Prenons les choses dans l'ordre:
En premier lieu, vous allez reprendre un à un tous vos fichiers sur le serveur, et vous les réencodez en UTF-8. Sous Mac, TextEdit le fait très bien avec un simple "Enregistrer sous", sous windows je suppose que le notepad doit faire pareil.
Vérifiez que votre conection FTP est en mode binaire, et pas ASCII (ça évitera bien des problèmes).
Ensuite nous allons nous intéresser à chaque brique logicielle.
• APACHE:
A priori vous n'avez pas accés à la config d'Apache, peu importe. Dans le fichier .htaccess (à la racine de votre site web, si il n'existe pas créez-le), vous ajoutez la ligne suivante (c'est la même si vous pouvez accéder au httpd.conf):
AddDefaultCharset UTF-8
• PHP:
Alors là, deux solutions, soit PHP est installé sur votre serveur avec la librairie mbstring, soit il ne l'est pas. Sincèrement je vous souhaite qu'elle soit incluse, sinon je vous invite à ramer sur les forums et prier pour que php6 sorte vite.
Si la librairie MBSTRING est installé, vous devrez tout de même remplacer certaines fonctions comme strlen() par mb_strlen() (mb=multi-byte) pour que le compte soit bon. Voyez ici quelles fonctions posent problème.
• MYSQL
J'ai lu dans vos pensées: vous vous êtes dit après PHP le plus dur est fait. Grave erreur.
Déjà, constatation préliminaire, phpMyAdmin ne vous sera d'aucun secours: il gère très (très très) mal l'UTF-8.
Essayons d'ordonner nos idées.
Si vous voulez faire mieux et plus rapidement que ce que j'ai fait (et surtout si votre base n'est pas un vaste foutoire avec deux encodages différents sur une même table ;-)
• Faites une sauvegarde (commande DUMP)
• Recréez une nouvelle base en UTF-8 ;
CREATE DATABASE base CHARACTER SET utf8 COLLATE utf8_bin
• Changez les charset et collate, pour les mettre en UTF-8.
• Convertir le fichier de sauvegarde en UTF-8 (démerdez-vous)
• L'importer.
Enfin, pour chaque page PHP, lorsque vous déclarez le lien MYSQL, vous devez ensuite faire la requête suivante:
SET NAMES utf8
chez moi ça donne ça (c'est une fonction de ma librairie qui crée le lien MYSQL a chaque instance de page):
$link = mysql_connect ($db_host,$db_user,$db_pass) or die ('Erreur : '.mysql_error());
mysql_select_db($db_db) or die ('Erreur :'.mysql_error());
mysql_query("SET NAMES, 'utf8'");
return $link;
• Concernant le code HTML.
Il faut en dernier lieu s'intéresser à ce qui arrive chez le client. A priori nous supposons que son navigateur accepte l'UTF-8.
Votre page HTML doit contenir la balise meta suivante:
Si vous travaillez en XML, se sera
Concernant les formulaires, surtout ne faite pas la même erreur que moi, ça vous évitera de perdre les précieuses heures qui vous séparent de votre mort et que vous devriez consacrer à chérir vos proches:
!! DANS LA BALISE N'OUBLIEZ SURTOUT PAS SOUS PEINE DE GACHER VOTRE DB DE PRECISER L'ENCODAGE !!
par exemple la présente page, quand j'édite la source, le form prend l'allure suivante:
et normalement tout ira bien.
Je me tiens à votre disposition pour toute question là dessus (j'ai bien mis les mains dans le cambouis, alors allez-y je suis chaud)
Voici quelques raccourcis utiles pour mac os x.
Au démarrage:
Pomme () +
. (point) Au moment du choix de l'OS, éjecte le CD
alt P R Zappe la PRAM. Maintenir jusqu’au deuxième son.
alt P R Efface la NV RAM. Identique à la r.a.z. totale dans l’Open Firmware.
C Démarre depuis un CD.
D Force le disque dur interne à être l’unité de démarrage
N Maintenu jusqu’au logo Mac, provoque le démarrage depuis un serveur réseau
CTRL MAJ On Réinitialise le power manager (ordinateur éteint)
MAJ Démarrage en mode sécurisé, avec desactivation des extensions non essentielles
V Mode verbose (affiche le démarrage en mode texte
S démarre en mode utilisateur unique
Pomme
Q quitter application
W fermer fenêtre
H masquer application
Z annuler
A sélectionner tout
X couper
C copier
V coller
I infos
P imprimer
N nouveau
S enregistrer
maj S enregistrer sous
O ouvrir
retour chariot supprimer fichier
tab passer d'une application à l'autre
maj esc forcer à quitter
espace rechercher fichier
fichiers texte:
i italique
b gras
u souligné
I've just received my brand new macbook, and unfortunately, Corel Draw is crashing on startup as well as the other applications of the suite.
I've tried to google this error and get not enough details on the way to troubleshoot it.
After a few days I've found the solution: Install the latest coreldraw update, and configure a default printer. And then, on corel start, maintain the caps key to refresh the desktop environment.
That's now works.
J'ai commencé a mettre au point une nouvelle version de ce site, sans tables et en utilisant un standard connu: le xhtml / css. Le résultat escompté a bien été retranscrit par Mozilla et Safari, mais bien sûr il fallait bien qu'Internet explorer s'illustre par sa médiocrité. Résultat des courses: une série de hacks css, et presque trois fois plus de temps pour développer la nouvelle interface, tout ça parce qu'un navigateur ne suis pas les standards.
You may experience some problems, under mac os x, with older applications, like Palm Desktop which takes on consideration the ressource fork of files.
I've found softwares from a japanese programmer that can solve all problems concerning ressources fork. All those softwares are native mac os x applications.
I've found softwares from a japanese programmer that can solve all problems concerning ressources fork. All those softwares are native mac os x applications.